
We have prepared several Excel macros for use with the Level III program. The macros make the reporting process easier by formatting the report: adding headers, calculating subtotals and totals, sorting by various fields such as job or account codes, placing data into groups, and otherwise sprucing things up for printing. We have made the macros fully editable. That means, if desired, you can also customize the macros for your own special purposes.
Note that because of changes made by Microsoft, AnyPO's macros may not run on all versions of Excel. We are happy to provide the macros but we can make no guarantees on whether they will run or not on your version.
From time to time, we may add new macros, and you might want to check back occassionally to see what's new.
Download Macros
To download macros, click on the link: AnyPO Macros
The macros come in self-extracting zip file. Download the file. Remember the directory where you save the downloaded file. Double click on the name of the file to unzip the file. You'll need to indicate where you'd like to extract the files.
Next, you'll need to add the macros to Excel. You only to have to do this once. After adding them, they will always be available to you. Information on adding AnyPO's macros is found here: Adding Macros to Excel
Macros Available
Seven macros are currently available. Here's more information:
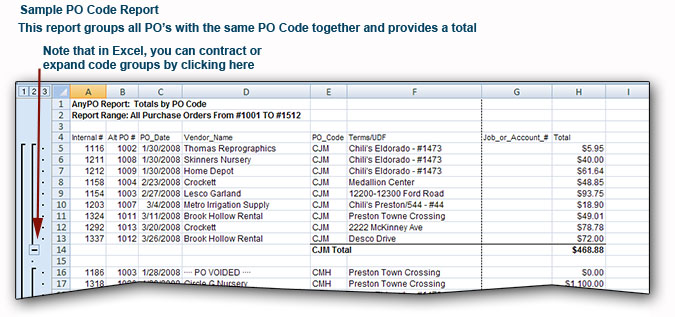
PO Code Report. If you have entered a code in the PO Code field of the Main Purchase Order Screen, this macro will provide totals for each code. It begins by sorting all of the PO's into their respective code, and provides subtotals of each code. Along with the subtotals, it provides a grand total of all activity. It also neatly formats the report for printing purposes.
To create the data for the macro, start AnyPO. Select FILE >> EXPORT AND REPORT GENERATOR. From the list of profiles at the top of the screen (#1), select "Excel Macro Reports." Then select which PO's you want in the report in #4. You can select "All" of the PO's. You can select from a list. You can enter a range of dates.
After the selecting the range of PO's that you want, check to make sure there's a checkmark beside: "If exporting to a dBase or Tab delimited file, immediately start up spreadsheet program for editing and/or printing." Also make sure there's a checkmark beside: "First Record: List Field Names."
Click the button: "Start Export Process." Excel will open with the data in place. Next select "A_PO_Code_Report" from the list of macros and run it. If you're not sure how to run a macro, here's more information:
Using AnyPO's Macros (Older than Excel 2007)
Below is a sample PO Code report:
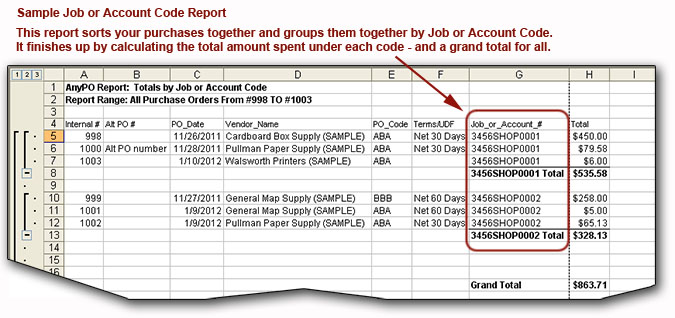
Job or Account Code Report. If you have job codes or account codes, this macro will provide totals for each code. It begins by sorting all of the PO's into their respective code, and provides subtotals of each code. Along with the subtotals, it provides a grand total of all activity. It also neatly formats the report for printing purposes.
To create the data for the macro, start AnyPO. Select FILE >> EXPORT AND REPORT GENERATOR. From the list of profiles at the top of the screen (#1), select "Excel Macro Reports." Then select which PO's you want in the report in #4. You have several choices. You can select "All" of the PO's. You can select from a list. You can enter a range of dates.
After the selecting the range of PO's that you want, check to make sure there's a checkmark beside: "If exporting to a dBase or Tab delimited file, immediately start up spreadsheet program for editing and/or printing." Also make sure there's a checkmark beside: "First Record: List Field Names."
Click the button: "Start Export Process." Excel will open with the data in place. Next select "B_Job_OR_Account_Code" from the list of macros and run it. If you're not sure how to run a macro, here's more information:
Using AnyPO's Macros (Older than Excel 2007)
Below is a sample Job or Account Code Report:
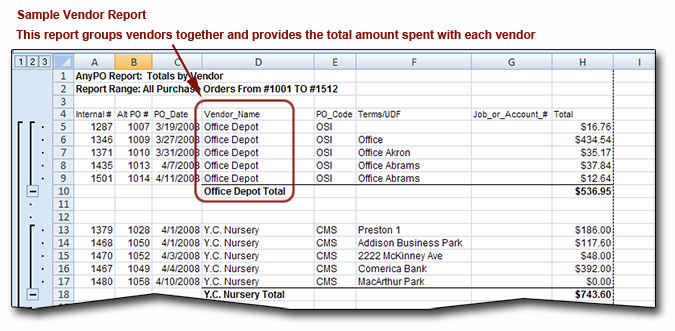
Vendor Report. This is a handy report to find out how much you've order from each of your vendors. It begins by sorting all of the PO's by the Vendor, and provides subtotals for each vendor. Along with the subtotals, it provides a grand total of all activity. It also neatly formats the report for printing purposes.
To create the data for the macro, start AnyPO. Select FILE >> EXPORT AND REPORT GENERATOR. From the list of profiles at the top of the screen (#1), select "Excel Macro Reports." Then select which PO's you want in the report in #4. You have several choices. You can select "All" of the PO's. You can select from a list. You can enter a range of dates.
After the selecting the range of PO's that you want, check to make sure there's a checkmark beside: "If exporting to a dBase or Tab delimited file, immediately start up spreadsheet program for editing and/or printing." Also make sure there's a checkmark beside: "First Record: List Field Names."
Click the button: "Start Export Process." Excel will open with the data in place. Next select "C_Vendor_Report" from the list of macros and run it. If you're not sure how to run a macro, here's more information:
Using AnyPO's Macros (Older than Excel 2007)
Below is a sample Vendor Report:
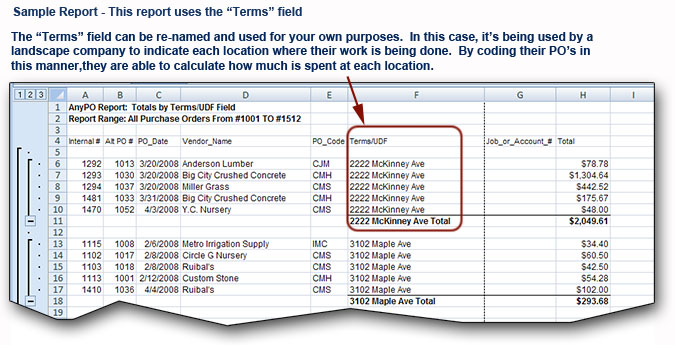
Terms (or User Defined) Report. The terms field on the Main Purchase Order Screen is multi-purpose. It can be used for the terms of the order. But often times the vendor will already have established terms, and using this field repeats information that has already been standardized between you and the vendor. That makes the field available for your own purposes. This field is useful since it has 36 characters of space and appears on the printed invoice. It can be used for an additional PO code or other purposes. A common use of it is a sub-category that fits under the PO code. In fact, a macro is available to provide totals as a sub-category under PO code. There's also another macro available which provides totals of PO codes as categories under the terms code.
It begins by sorting all of the PO's by the Terms code, and provides subtotals for each code. Along with the subtotals, it provides a grand total of all activity. It also neatly formats the report for printing purposes.
To create the data for the macro, start AnyPO. Select FILE >> EXPORT AND REPORT GENERATOR. From the list of profiles at the top of the screen (#1), select "Excel Macro Reports." Then select which PO's you want in the report in #4. You have several choices. You can select "All" of the PO's. You can select from a list. You can enter a range of dates.
After the selecting the range of PO's that you want, check to make sure there's a checkmark beside: "If exporting to a dBase or Tab delimited file, immediately start up spreadsheet program for editing and/or printing." Also make sure there's a checkmark beside: "First Record: List Field Names."
Click the button: "Start Export Process." Excel will open with the data in place. Next select "D_Terms_Report" from the list of macros and run it. If you're not sure how to run a macro, here's more information:
Using AnyPO's Macros (Older than Excel 2007)
Below is a sample report in which the "Terms" field has been customized for the user's own purposes:
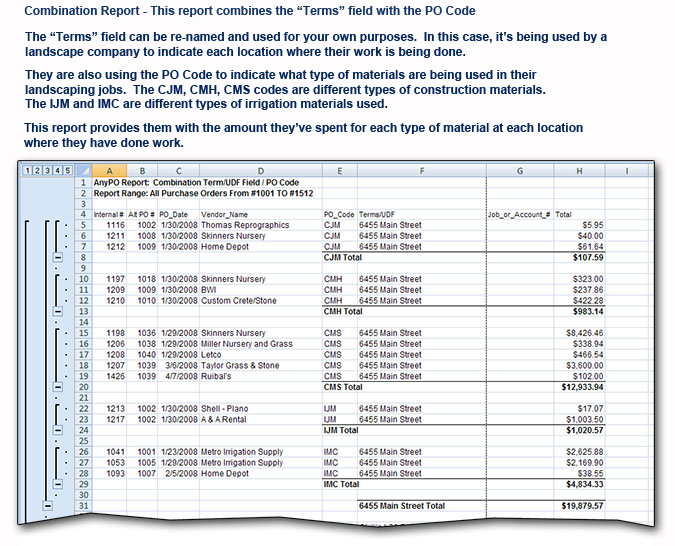
Combination Report (First Terms and then PO Code). As mentioned above, the terms field on the Main Purchase Order Screen can be used for a number of different purposes. One use of it is to utilize it as a overall category, and then use the PO Code as sub-categories that fit under it. That's what this report does. (Note that there is another report available - next - which uses it as a sub-category under the PO code.)
It begins by sorting all of the PO's by the Terms code. Then it sorts again by the PO Code. It continues by grouping each of the PO's with the same PO Code together and subtotalling each group. It also does a total for overall Terms code (including all the PO Codes that fall under it). Finally, it provides a grand total of all activity and neatly formats the report for printing purposes.
To create the data for the macro, start AnyPO. Select FILE >> EXPORT AND REPORT GENERATOR. From the list of profiles at the top of the screen (#1), select "Excel Macro Reports." Then select which PO's you want in the report in #4. You have several choices. You can select "All" of the PO's. You can select from a list. You can enter a range of dates.
After the selecting the range of PO's that you want, check to make sure there's a checkmark beside: "If exporting to a dBase or Tab delimited file, immediately start up spreadsheet program for editing and/or printing." Also make sure there's a checkmark beside: "First Record: List Field Names."
Click the button: "Start Export Process." Excel will open with the data in place. Next select "E_Combination_Report_Terms_AND_POCode" from the list of macros and run it. If you're not sure how to run a macro, here's more information:
Using AnyPO's Macros (Older than Excel 2007)
Below is a sample combination report ("Terms" First and then PO Code):
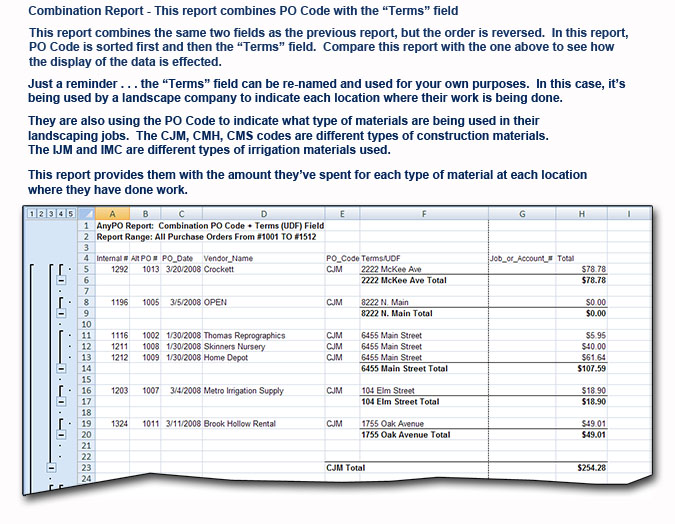
Combination Report (First PO Code, then Terms). As mentioned above, the terms field on the Main Purchase Order Screen can be used for a number of different purposes. One use of it is to utilize it as a subcategory to the PO Code. That's what this report does.
It begins by sorting all of the PO's by the PO Code. Then it sorts again by the Terms field. It continues by grouping each of the PO's with the same Terms code together and subtotalling each group. It also does a total for overall PO Code (including all the Terms codes that fall under it). Finally, it provides a grand total of all activity and neatly formats the report for printing purposes.
To create the data for the macro, start AnyPO. Select FILE >> EXPORT AND REPORT GENERATOR. From the list of profiles at the top of the screen (#1), select "Excel Macro Reports." Then select which PO's you want in the report in #4. You have several choices. You can select "All" of the PO's. You can select from a list. You can enter a range of dates.
After the selecting the range of PO's that you want, check to make sure there's a checkmark beside: "If exporting to a dBase or Tab delimited file, immediately start up spreadsheet program for editing and/or printing." Also make sure there's a checkmark beside: "First Record: List Field Names."
Click the button: "Start Export Process." Excel will open with the data in place. Next select "F_Combination_Report_POCode_AND_Terms" from the list of macros and run it. If you're not sure how to run a macro, here's more information:
Using AnyPO's Macros (Older than Excel 2007)
Below is a sample combination report (PO Code first and then "Terms"):
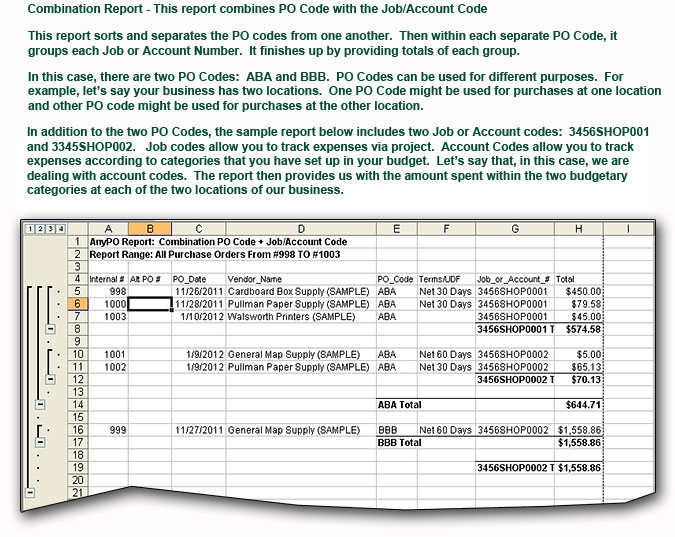
Combination Report (PO Code followed by Job/Account Code). This combination report starts with the PO Code as an over-all category, and use the Job/Account Code as a sub-category which falls under the PO Code.
It begins by sorting all of the PO's by the PO Code. Then it sorts again by the Job or Account field. It continues by grouping each of the PO's with the same Job/Account codes together and subtotalling each group. It also does a total for overall PO Code (including all the Job codes that fall under it). Finally, it provides a grand total of all activity and neatly formats the report for printing purposes.
To create the data for the macro, start AnyPO. Select FILE >> EXPORT AND REPORT GENERATOR. From the list of profiles at the top of the screen (#1), select "Excel Macro Reports." Then select which PO's you want in the report in #4. You have several choices. You can select "All" of the PO's. You can select from a list. You can enter a range of dates.
After the selecting the range of PO's that you want, check to make sure there's a checkmark beside: "If exporting to a dBase or Tab delimited file, immediately start up spreadsheet program for editing and/or printing." Also make sure there's a checkmark beside: "First Record: List Field Names."
Click the button: "Start Export Process." Excel will open with the data in place. Next from the list of macros select:
"G_Combination_Report_POCode_AND_JobORAccntCode"
Then run the macro. If you're not sure how to run a macro, here's more information:
Using AnyPO's Macros (Older than Excel 2007)
Or Using AnyPO's Macros (Excel 2007 or newer)
Below is a sample combination report (PO Code first and then Job/ Account Code):
Adding Macros to Excel
The best procedure is to add the Macros to a worksheet in Excel called the Personal.xls. When macros are placed in this worksheet, they are available in all worksheets. In other words, as soon as you create a new spreadsheet in Excel, you'll be able to access AnyPO's Macros. If you don't add the macros to Personal.xls, then you'll need to import the macros each time you create a spreadsheet that requires the use of the macros .
How you set things up depends on your version of Excel . . .
- If your version of Excel is dated 2007 OR later, go here
- If you have a version of Excel released before 2007, go here
Procedure for All Versions of Excel dated 2007 or later
A. First, check to see if you have a personal.xlsb file.
1. Start Excel. Click on the Office Button (the big button on the upper left of the Excel screen). Select OPEN.
2. Browse through the directories and find the XLSTART directory for Excel 2007. Here's how to find it:
If you have Vista or Windows 7. Note that "YourName" will often be your name, like Cindy, Justin, etc. It's the directory on the computer where your files are kept.
B. Creating a personal.xlsb file(If necessary)
If you don't have a Personal.xls, do the following:
1.Start Excel so that you have an empy worksheet showingC. Add AnyPO's macros to Personal.xlsb
2.Click on the Office button (the big button on the upper left of the Excel screen) and select SAVE AS and choose "Excel Binary Workbook."
3. Browse to the XLSTART directory as described in "A" above.
4. Save the empy worksheet as Personal.xlsb. (Excel will automatically add the .xlsb.) You're ready to move on.
1. If you've found or created Personal.xlsb, it will probably be showing on your Excel screen. If not, open it by doing the following:
- Start Excel. Click on the Office Button (the big button on the upper left of the Excel screen). Select OPEN.
- Browse through the directories and find the XLSTART directory for Excel 2007. (See "A" on how to find XLSTART above.)
2. Now that you have Personal.xlsb showing on the Excel screen, we'll need to open up Visual Basic (built into Excel). To do that, you need to have a "Developer" tab on top of the Excel Screen. If you don't see the "Developer" tab (which is the usual situation), you'll need to add it. To add it, do the following:C. Using AnyPO's macros in Excel 2007 (or above)
- Click on the Office Button (the big button on the upper left of the Excel screen). Look at the bottom right of the menu that appears. Right next to "Excel Exit" you'll see "Excel Options." Click on the "Excel Options" button.
- On the left side of the dialog box that appears, make sure "Popular" is selected. Then look at the checkboxes. You'll see "Show Developer Tab in the Ribbon." Place a checkmark here.
- Exit from the menu. When you exit from the menu, you'll see a new "Developer" tab.
3. Click on the "Developer" tab. On the far left, in the ribbon area, you'll see a "Visual Basic" button. Click on it.
4. The Visual Basic Screen will appear. Select File >> Import File from the menu.
5. Navigate to the folder where you have saved AnyPO's macros. The macros will have a .bas extension, ie Consign.bas, Inventory.bas. Click on the desired macro, and then click "Open."
6. Select File >> Save Personal.xlsb. this will save your macro(s) to the Personal workbook.
7. Now select File >> Close and Return to Excel.
8. At this point, we want to hide Personal.xlsb. so that it doesn't appear every time you open Excel. To do so, select the View tab. You'll find an option: "Hide" Select this option and the sheet will be hidden.
9. Quit Excel and save your changes.
1. Follow the special directions for each macro above. AnyPO will start Excel with the data in place.
2. Once Excel has started with the data from AnyPO, select
the "View" tab.
3. After selecting the "View" tab, click on the "Macros" button. Then click on the "View Macros" menu.
4. From the "View Macros" list, select the macro you want to run, and then click "Run."
Procedure for All Versions of Excel Dated Prior to 2007
First
. . .Check for Personal.xls
First, check to see if you have a personal.xls file. Start
Excel. Click on the Window menu. Do you see it listed
there. If not, click Window >>Unhide. Do you
see it there? If you do see it, skip the next step.
A. Creating a personal.xls file(If necessary)
If you don't have
a Personal.xls, do the following:
1.Start Windows Explorer.B. Add AnyPO's macros to Personal.xls
2. Navigate to C:\Program Files\Microsoft Office\Office 10\XLStart. If you installed Excel or Microsoft Office in another location, navigate to the \XLStart folder in that location.
2. In the right pane of Windows Explorer, right-click. Select New >> Text Document.
3. Rename the file as Personal.xls.
4. If Windows asks you to change the file name extension, click "Yes."
5 .Start Excel and open personal.xls.
6 . Select Window >> Hide. Exit Excel.
7. When asked if to save your changes, click "Yes." The new Personal workbook will be available the next time you start Excel.
1. Start Excel. Select Window >> Unhide.C. Using AnyPO's macros
2. In the Unhide dialog box, make sure that "personal.xls"
is selected. Click OK.
3. Select Tools >> Macro >> Visual Basic Editor. When the Visual Basic Editor has started, select File >> Import File.
4. Navigate to the folder where you have saved AnyPO's macros. The macros will have a .bas extension, ie Consign.bas, Inventory.bas. Click on the desired macro, and then click "Open."
5. Save the module, quit the Visual Basic Editor. Hide personal.xls by selecting Window >> Hide
6. Quit Excel and save your changes.
1. Follow the special directions for each macro above. AnyPO will start Excel with the data in place.
2. Once Excel has started with the data from AnyPO, select
Tools >> Macro >> Macros.
3. Select the macro you want to run, and then click "Run."
AnyPO is another carefully crafted software program from: