Copyright & Revisions: Revised, reformatted and updated in 2013. Original copyright © 1997.
Reproduction Information: you are welcome to provide links to this page or to use short quotations and paraphrases in other documents as long as they appropriately reference the source. There is no charge for non-profit organizations to reproduce or publish extensive parts or all of this paper, but please obtain advanced permission from Ron Watters (wattron@isu.edu). Photo credits: U.S. Forest Service and Ron Watters.
Abstract
Introduction
Avalanche courses can be structured in a number of different ways. The most desirable format, and the one I most enjoy teaching, consists of two evening sessions, usually a Wednesday and Thursday followed by two field sessions on Saturday and Sunday. I realize that this is an ideal situation. You may not have the luxury of being able to offer a multi-day course. While I use the two-night, two-field session format as the basis of this paper, I also suggest ways in which you can structure shorter courses. If you live in the interior west where avalanche forecasting is difficult and winter backcountry users are often at risk, then I strongly recommend trying to incorporate some type of field session along with at least one evening session. The field session helps reinforce what has been learned in the classroom, and it gives students the opportunity to learn the proper way of using avalanche transceivers. Transceiver instruction is particularly valuable since many of those who own them have only a rudimentary knowledge of their use.
A Starting PointAt the beginning of any avalanche class, whether it is a one-night affair or held over a period of several days, I like to start from a historical perspective. One of the best ways of making the class relevant to your students is to discuss an accident that has occurred in your area. Such a starting point is also educational. Reviewing case studies and discussing the events leading to an accident and the accident itself is an effective way of teaching. There's always much to be learned from someone else's mistakes. It's also an eye opener for some outdoor users. After several accident-free years in a backcountry area, people can be lulled into believing that avalanches just don't happen, or if they do happen they don't kill anyone. Historical information to the contrary helps to dispel such notions.Advanced Course MaterialIf you are able to hold an avalanche course over a period of several days, you'll want to spend the first couple of hours of class time on snow physics, covering the broad topics of crystal formation, snow crystal identification, and metamorphic processes. The following is a suggested teaching sequence:
Excellent sources of information for this portion of an avalanche course are two books Field Guide to Snow Crystals by Ed LaChapelle and Snowflakes by Ken Libbrecht. LaChapelle's book is now out of print and used copies are generally on the expensive side. If you can get a copy at a resonable price, however, it's well worthwhile purchase
Speaking of reference materials, the best overall text on avalanche safety is Bruce Tremper's Staying Alive in Avalanche Terrain. Tremper is a fine writer, a superb avalanche forecaster, and the material he covers in the book is spot-on.
Snow crystal identification is followed by a discussion of equi-temperature (rounding) and temperature gradient (faceting) metamorphism. Rounding and faceting are the preferred terms these days. They describe the resulting shape that the crystals take during metamorphism, but I do also like to use equi-temperature and temperature gradient metamorphism rather than equilibrium and kinetic growth metamorphism (also new terms) because the former terms better describe why it happens. (To avoid complication, and because they are such poor descriptors, I completely leave out the oldest terms: constructive and destructive metamorphism.)
To do it right, plan on at least two hours to cover snow physics. In my courses that's all I do the first night. The next night is allocated to the more interesting subject of the causes and behavior of avalanches. If you have only one night, however, then you'll want to minimize the amount of time spent on studying snow. Metamorphic processes can be confusing and can side track some students, causing them to miss some of the important safety material. If your time is limited then identify some basic snow crystals and dispense with snow physics altogether.
Teaching Hints and Use of Visual AidsIf you spend a considerable amount of time outdoors in the winter, you'll be able to gradually accumulate a collection of photographs which can be used to supplement your avalanche courses. Friends and skiing companions may also have good photographs from which you may make copies. One 35 mm slide a friend gave to me some time ago is, of all things, a photograph of a bridge. It is, however, a significant bridge from an avalanche standpoint.
About 45 years ago, his father had taken a photograph of a bridge built on Teton Pass just outside of Jackson Hole, Wyoming. When designing the new road, highway engineers were well acquainted with one especially nasty avalanche on the pass known as Glory Slide. To deal with Glory, the engineers decided to build a bridge which spanned the path of the avalanche. The idea was that when Glory Slide came down, it would go under the bridge, forgoing the need to close the road, a frequent and annoying happening on the Teton Pass. Alas, during the first winter, before the highway was opened, Glory Slide came down and damaged the bridge. During the lecture, I first show my friend's photo of the bridge. Then I show a photo in the winter taken from the same place the year after the bridge. The two images—the first showing a bridge and the next showing no bridge—are powerful visual tools to illustrate the tremendous force of avalanches.
As another example of how you can make your avalanche lecture more interesting, let's use the topic of settlement as an example. Settlement is important since it provides a visual clue to the backcountry traveller how quickly a new snow fall is stabilizing. When I talk about settlement, I first show an illustration of a snow pack made up of stellar snow crystals, the arms of which are keeping adjacent snow crystals far apart. Side by side on the slide is a second illustration showing a snow pack with equi-temperature snow grains. The rounded snow grains pack together easier and the illustration graphically shows that the snow pack has settled. This isn't anything out of the ordinary. The illustrations are commonly found in avalanche texts. Moreover, it easy enough for anyone to create it using common graphic software.
With the illustrations still showing, I then project a dual image of a meter stick placed in the snow measuring total snow depth. The first part of the image is a close-up depicting the total depth of the snow pack after a new snow fall, and the second part depicts the total depth (now reduced) after a few days of moderate temperatures. The dual images compliment one another and help make your lecture more understandable.
Use of Anecdotal MaterialAnother useful teaching technique which adds color and texture to an avalanche course is the use of anecdotal material. Any course is more interesting when it is supplemented with personal experiences or the experiences of others. Everyone likes a story or two and used effectively, they can help in your student's understanding of the material at hand. The accident reports found in Snowy Torrents are a good source of anecdotal material, but you can also glean information from newspaper reports and outdoor narratives.
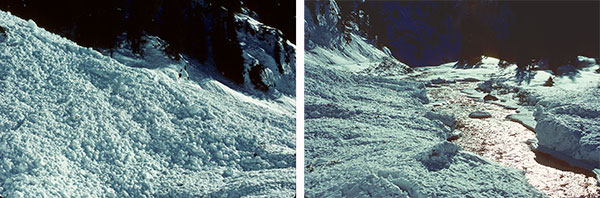
One story that I tell and illustrate with slides is about a journey that I took a number years ago down Marsh Creek which is one of the source streams of the Middle Fork of the Salmon River in Idaho. As we began skiing into the canyon we noticed very large sunballs on the hillsides. The sunballs were about four days old. Sun balls are one of the indicators of equi-temperature metamorphism (rounding) which is a good sign, a sign that the snow pack is stabilizing. It's a good sign, however, as long as the sun balls are small. When the balls get larger, it indicates that free water is percolating deeper into the snow pack, lubricating old crust layers or worse yet, lubricating a depth hoar at the bottom of the pack.
It wasn't too long on our trip before we came across the deposition zones of some incredibly large avalanches. The avalanches were about the same age as the sun balls, about four days old, and they were impressive. One after another, they had come hurtling into the canyon, descending 2,000 to 3,000 feet and ripping out mature ponderosa pine three feet in diameter. About midway through our trip, we came upon one massive avalanche which had dammed Marsh Creek. The four of us on the trip stood in awe, looking at the huge pile of snow and the place where the water had finally breached and cut an icy "V" through the face of the rubble.
The Meat of Any Avalanche CourseWhatever format your avalanche course takes, you'll want to pay particular attention to the material in this section. This is the meat of an avalanche course, where the lecture centers on the causes of avalanches and ways in which outdoor travelers can protect themselves. Before going too much further, however, I want to advise caution. If you are not careful how you structure this part of the course, it can get confusing and even contradictory. Different instructors will use different ways of approaching the material, but I like to divide the lecture into five bit-sized pieces. I classify the causes of avalanches into five basic factors, in this order:
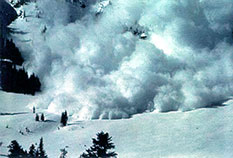
The use of a combination of photographs and graphics can make this part of the lecture particularly effective. Use graphics to illustrate basic concepts and then photographs from backcountry trips to illustrate specific instances. I'm a believer in picking out one fact whenever you give a lecture. I tell the class that if they remember anything in the lecture, remember this one fact. For avalanches it is this: avalanche danger is greatest during and shortly after intensive snow falls. Since it is so important, it is the first topic that I cover. It's easily illustrated. Just use a photograph that you've taken during a blizzard.
There's plenty of source material available which you can use to prepare your lecture, and it's beyond the scope of the this paper to go into any detail. What's important here, however, is how the material is covered.
One of my goals in presenting the material is to try to keep the material tied as closely as possible to local areas. For instance, when discussing slope angles (which I cover under the "Terrain Factor") I use examples that my students will be familiar with. I have gone out to a number of nearby Alpine and backcountry areas and have used an inclinometer to measure slope angles. I then show the slides of each area, explaining what the slope angle is and the degree of risk associated with it.
Covering each of the five factors can easily take a couple of hours. If it is a one-evening course, you'll want to be sure that you leave room for a discussion of route finding, safety equipment and rescue:
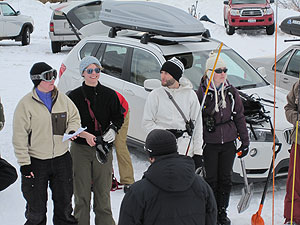
Field SessionsField sessions are typically held on the weekend. Having one field session in addition to an evening theory class gives you another chance to review important parts of the class. It gives students a chance to process the information that they've learned and increases the likelihood that they will remember it. Most importantly, it gets students actually outside in the snow practicing avalanche safety skills.
When avalanche courses are offered to the general public or, for that matter, to the general student body, you will end up with a great range of abilities and fitness levels. Several years ago, I had a woman in a class who had been ill the week before. The field session was held on a cold day, and still weak from her illness, she became hypothermic. By the time we realized something was wrong, she was already so faint and cold that she had to be carried to the nearby ski lodge. Fortunately, she recovered quickly at the lodge, and we were able to continue the class without much of a disruption. If, however, we had been in remote location, a simple avalanche class would have turned into a survival epic.
When it comes time to determine the location of the field session make sure you find a place with adequate parking, and, if possible, nearby slopes. If all you have to work with is flat, snow covered terrain, you can still hold a fairly effective and informative field session. You shouldn't forgo a field session simply because you don't have ideal terrain. Pay particular attention to the location of the snow pit. I often use a steep slope at the base of our local ski area which I know is perfectly safe.
If I'm not at the ski area, then I look for small gully running through a wheat field. Ideally, you want a short, safe slope or the side of the gully with at least a 30 degree angle for doing sheer and Rutschblock tests. Once again, if you can't find an ideal slope you can still demonstrate the basics of digging and analyzing a pit—even on level terrain. A good way of approaching the first field session is to set up three stations. The class divides into three groups, each group spending an hour at a station and then rotating to the next station until all three have been visited. The stations are:
The probing session, although tedious, is usually enlightening in that it shows how difficult it is to locate someone even in small avalanches. Too, it helps reinforce the importance of using transceivers when traveling in avalanche country. One hint with the probing session: be sure to strap a transceiver to each dummy you bury. A climbing friend of mine was helping me teach the probing session one year, and for the buried victim he used a rucksack sack with his climbing rope inside.
The first group came up to his station and after some basic instruction, started going through a coarse probe and then a fine probe. In the end, they were unsuccessful in finding his pack. The next group came up and after an hour, they were unsuccessful. Finally, the third group arrived. After my friend explained that the previous two groups were unsuccessful in finding his pack, the students were determined to find it. But after another hour, they, too were unable to find it. By this time the slope had been so disturbed that my friend had no idea where he had buried his pack. We dug for several hours looking for it and eventually had to give up. It wasn't until months later in the spring that he returned and finally found it just starting to melt out of the snow.
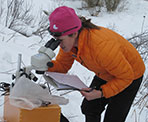
The last of the three stations is a snow pit. At this station, students are talked through the steps of digging and analyzing a hasty pit. They look for layers in the snow pack, pick out crystals and try to identify them. Once they've had ample opportunity to look at crystals, sheer tests are done followed by a Rutschblock test. Any new crystals turned up by the tests are examined. When everything is finished, the students make a guess of how stable they think the pack is.
Second Field SessionIf it is possible to offer a second field session, then, by all means, do it. The second field session reinforces the first, and it gives students greater freedom to practice skills. This is the time in the course to step back as an instructor. You can provide some introductory guidance and answer questions on a one to one basis, but give students lots of time to do their own work. I concentrate on two field exercises: transceiver searching and profiling snow pits.
For transceiver work, use a much larger search area than what was used the day before. Make the searches more challenging by burying more than one transceiver at a time. By timing each of the searches with a stop watch, you can add an element of urgency. Upon pinning down a victim's location, shovels need to be ready and digging begun immediately. I make sure that all students do at least three searches on their own.
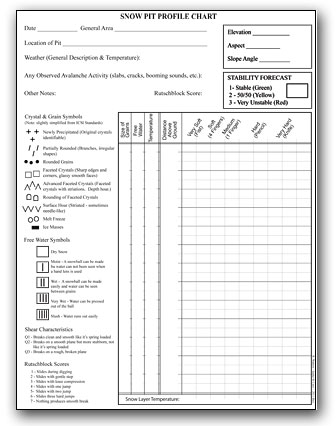
While one half of the class is working on the transceiver search, the other half of the class is working on snow pits. Have them work in pairs and give each pair a clip board with a snow profile chart. They, then, dig their own pit, graphing out the pit profile, and indicating on the chart where and what snow crystals are found.
After doing some shear tests and a Rutschblock test, they give the pit an overall stability rating.
Videos and Avalanche Forecasts as Teaching ToolsIt isn't until the end of the class after the field session that I use videos. I think that instructors tend to over rely on videos and let them do the teaching for them, but towards the end of a course, after the instructor has done his work, a video can be a very useful tool in reviewing previously covered material in a more visual and entertaining manner.
I must say that I haven't been all that pleased with newer instruction videos on avalanche safety. Filmmakers have certainly made them more entertaining by including dramatic footage of skiers, boarders and snowmobilers caught in avalanches, but I give them only passing grades from an instructional standpoint. What they do seem to be good at is glorifying miscalculation (or calculation, however one might view it) showing scene after scene of someone caught in an avalanche, tumbling off down a slope - and maybe surviving or not. It's all in a day's work in the backcountry. I'm still using Avalanche Awareness: A Question of Balance. Yes, it's old and bit out-dated, but it has a respectful and humble approach to the subject, and from an instructional standpoint, it's head and shoulders above new films.
Lastly, something that I always try to incorporate in any class is information on where to find avalanche forecasts. For more advanced avalanche classes, you'll probably want to take it one step further. Print up a couple of avalanche forecasts off the Internet and hand out copies to everyone. Internet avalanche forecasts are terrific learning tools. The terminology used in the class, the metamorphic processes that you've discussed, the snow pits that students have dug in the field sessions, all come together in a practical way in an avalanche forecast. Read through the reports and ask questions about it to stimulate discussion among your class.
Other Resources
American Avalanche Association - Course Content. The American Avalanche Association (AAA) has published an excellent summary of suggested course content for US avalanche education. The objectives and content of the Level 1 course are found here: . https://www.americanavalancheassociation.org/edu_guidelines.php . Along with this information, you'll find many other helpful educational tools on the AAA website.
Course Website. I maintain a course website to along with the course that I teach at the university. Here's a link to that site: . https://www.ronwatters.com/Avalanche.html
[END]
|
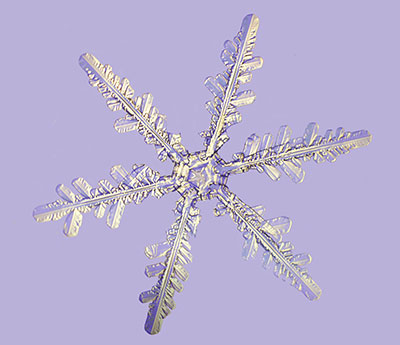
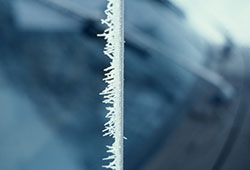
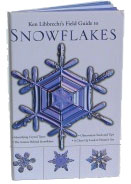 for your library. Libbrecht's book Snowflakes is recent, easily obtained, and filled with instructive photographs of snow crystals. Write Libbrecht or the publisher and ask permission to make scans of the photographs to be used in a Powerpoint of your lectures. It's likely you'll be able to obtain permission if you stipulate that the photos will be used only for classroom use—and if you are utilizing or recommending Libbrecht's book to your students. The visual clues the slides provide will later help when students are identifying snow crystals in their snow pits.
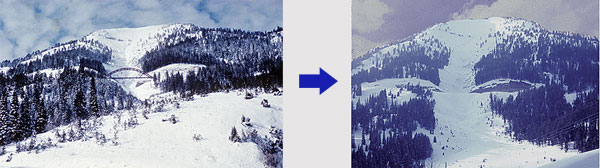
 I highly recommend that you hold field sessions in safe locations near a parking area. Unless you are teaching professional courses for ski patrollers or backcountry guides, it's not necessary to take a class up on a steep mountainside to dig snow pits and practice searching techniques. Remote locations take time to reach and invariably someone in the class doesn't have the equipment or skill to make it to and from such locations. If you're close to a parking lot and someone gets cold, he or she can easily return to a vehicle and warm up. That's not possible in the backcountry.
 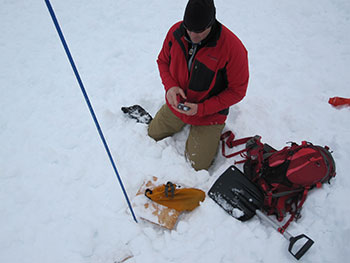 In the transceiver session, students learn how to conduct transceiver searches. After a brief introduction, transceivers are buried and participants spend the rest of the time doing searches. The second station, the probing station, should be held in a disturbed area of snow. By walking around and throwing snow around with a shovel, you can make something that appears to be an avalanche path and deposition area. Within the disturbed area, before the group arrives, bury a dummy (a pack full of clothing works adequately). Course, fine and spot probing are explained to the group, and then the group is allowed to organize itself and attempt to locate the buried "victim."
 The equipment needed for a snow pit won't break the budget: hand lenses for everyone, a couple of thermometers, snow cards, two or three compasses with an inclinometer and some flash cards. (Since I am university based, I also use microscopes in my courses, placing an emphasis on the science part of the course. They are very helpful, but, of course, for most avalanche courses, microscopes would not be available. Hand lenses do the job fine, and from a practical standpoint, it's all that students will have when out in the field.) The flash cards I use are home made and are simply drawings of precipitated and metamorphosed crystals. I found the flash cards very helpful, holding them up and talking about identification characteristics while students are looking at crystals through their lenses.