Copyright & Revisions: Revised, reformatted and updated in 2012. Original copyright © 1996.
Publication History: This is an updated version of the original paper first published in Proceedings of 1996 International Conference on Outdoor Recreation and Education. Citation: Watters, R. (1997). The art of teaching map and compass: Instructional techniques, curricular formats and practical field exercises. In Guthrie S. , Macke J. & Watters R. (Eds.), Proceedings of 1996 International Conference on Outdoor Recreation and Education. (pp. 177-185). Boulder, CO: Association of Outdoor Recreation and Education.
Reproduction Information: You are welcome to provide links to this page or to use short quotations and paraphrases in other documents as long as they appropriately reference the source. There is no charge for non-profit organizations to reproduce or publish parts or all of this paper, but please obtain advanced permission from Ron Watters (wattron@isu.edu) Abstract
The value of teaching map and compass in a classroom or an outdoor situation is often overlooked. A common impression held by many is that it is dry and unappealing. But, in reality, when taught correctly using a combination of exercises indoors and outdoors, map and compass can be one of the most enjoyable of all outdoor activities, generating excitement and enthusiasm even among the most reserved students. Moreover, the importance of navigation knowledge can't be overlooked. It is the most basic of all outdoor skills and has applications which carry over to every day life. A map and compass curriculum is easy to incorporate into any school or outdoor programming situation, requiring a minimum of equipment. This paper discusses general teaching principles, including some ideas on how to deal with one of the most vexing problem areas for teachers: declination. Two teaching scenarios are suggested including a two hour indoor/outdoor session and a weekend map and compass workshop. The paper concludes with an annotated list of map and compass references.
Introduction Map and compass is one of those areas of outdoor education that we tend to overlook. At first glance, it isn't as sexy as rock climbing or as in vogue as rope course or team building activities. It seems, well, to put it mildly, that map work is rather dry stuff. It's this unappealing image of map and compass which makes it something easily forgotten or glossed over. At second glance, however, there is much more to the subject than meets the eye. First and foremost, map and compass is the most basic of all outdoor skills. No matter what a person does in the outdoors -- hike, cross-country ski, hunt, canoe, or sail -- he or she will need to know something about maps and compasses. Moreover, the knowledge of rudimentary wayfinding techniques is important and useful in day to day living. We need map skills to decipher bus route maps of big cities as much as we need them to understand a topographic map of a favorite park. We rely on wayfinding principles to give us a sense of direction while walking through a downtown area as much as we rely on them to find our way around a wildlife preserve on cross-country skis. Benefits One of the nicest things about teaching map and compass is that it is truly the great equalizer, whether it is taught in a classroom or in an outdoor setting. It plays no favorites. It's for everyone: children or adults, men or women. It is a type of activity which transcends gender and ethnic boundaries. It can even be taught in the early grades when children first start going to school. The idea that only older children should be exposed to map and compass instruction is passe. Recent research (Blades & Spencer, 1989) indicates that very young children can learn and benefit from basic wayfinding skills. For school situations, map and compass instruction is a perfect activity for combining classroom work with experiential exercises in the outdoors. A teacher can start with an hour of instruction indoors, talking about a few fundamentals of maps and compasses and then move outside to allow students the opportunity to apply those concepts through orienteering games. When outdoors, teachers will notice a change come over students: they become excited and enthusiastic about what they are doing. I've seen this happen in college classes. Take a bunch of bored Physical Education students. Get them through an hour's worth of introductory material, and then lead them outside for one or two compass exercises. Suddenly, everyone is chattering and excited about what they are doing.
Costs This is all possible at minimum expense. Unlike many outdoor activities, map and compass is one in which the basic tools are relatively inexpensive. For younger children, a simple map of the school yard (costing nothing) is all that is necessary. Older children and adults will need topographic maps ($8 dollars each), but since topographic maps are made by the U.S. Geological Survey, an agency of the federal government, they are in the public domain and may be photocopied as many times as needed without worrying about copyright infringement.
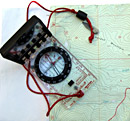
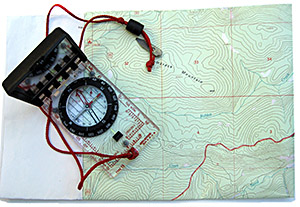
The most expensive part of teaching map and compass instruction is compasses. Compasses, however, aren't needed for young children. For all others, the expense is low. The finest compasses for outdoor use only cost around $50. The compass I use in my classes is the classic Silver Range. (Here's a link to the best price I could find: Silva Compass.) You can set the declination on the the Brunton 15 which is a huge advantage when teaching, and they are made in Sweden and not in China which keeps the quality high. If that's a bit out of your price range, adequate compasses can be found for around $15. While you can't set the declination, the Silva Polaris (with a slight modification described below) will work fine for instructional purposes. With its low cost, high value and ease to incorporate in a variety of educational situations, map and compass should be a part of any outdoor activity program.
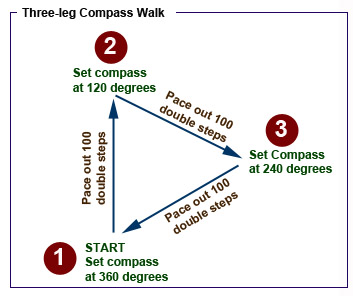
Teaching Tips and Curriculum Suggestions Note: For a look at some of the actual materials that I use in my map and compass classes, see Compass Techniques The following are some teaching suggestions, hints and curriculum ideas. It assumes that you are already familiar with map basics, but if you need to brush up on navigation concepts, a list of source materials has been included at the end of this paper. 1. When teaching map and compass, start with the basic idea of what a map is. Often, teachers will use the metaphor that a map is a representation of what one sees from an airplane, or "a view from above." This a suitable metaphor for the secondary grades and above, but for younger age groups, research by T. Ottosson (1988) indicates that the top down metaphor may be confusing. Instead, Ottosson found that referring to a map as "miniature world" provides a better basis for instruction. Young children already possess knowledge of the immediate world around them (the layout of the school and school yard and their neighborhood) and that understanding should be utilized as the starting point for map teaching. 2. For younger age groups, introduce the idea of directions and the purpose of a compass, but avoid getting into much detail about compasses. Compass bearings, the difference between magnetic north and true north are confusing, and it is best to concentrate on maps and how one can find their way using a map. Even at an advanced level, most orienteering is done without a compass, and navigation is accomplished primarily from map reading. 3. Use a combination of indoor and outdoor settings for teaching. Begin in the classroom with basic concepts and then move to the outdoors to actually use what students have learned. For an example, in my indoor session I introduce directions, compasses and how to set a bearing. I have the students set different bearings on their compass while still in the classroom. When everyone is comfortable with bearings, I move the class outdoors and have everyone participate in a three-leg compass walk (Kjellstrom, 1994). Three-leg Compass Walk. Of all map and compass exercises, the three-leg compass walk is one of the best -- and it can be done with nearly any age group. Start by having each student mark their location with a pencil or a small stick and setting their compasses to north (360 degrees). Once north has been set, they sight down the direction of travel arrow on the compass and pick out a landmark in the background. The landmark can be a tree, baseball backstop, a telephone pole, etc. The students then step out 100 paces. (These are double step paces. In other words, students should count each time their right foot touches the ground.) Everyone stops after 100 paces. The students are then directed to set their compasses to 120 degrees and they pace out another 100 steps and stop. Then everyone is directed to set their compasses to 240 degrees and pace out another 100 steps. At this point, they have completed walking a triangle and should end up fairly close to their starting point. The exercise quickly becomes a game among students to see how close they can come to their starting point.
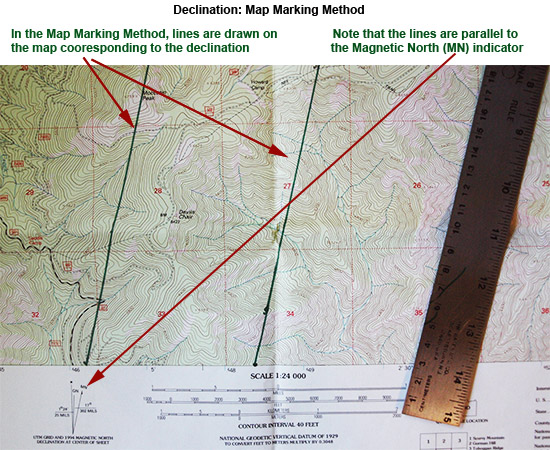
4. Progressive teaching. Begin with the basics and build upon them. This is particularly important when students are ready to go onto an orienteering course. Orienteering courses are simple to make. It's just a matter of tying orange surveyor's ribbon to trees or bushes at 7 or 8 locations and marking each location on a map. Using the map, students need to find each marked location (called a control point) and write down the number on the ribbon. For younger children, you might want to consider placing a surprise at one more of the control points: a piece of candy or a cracker jack toy. Always start out with a very basic course. Use easy to find locations to attach your control points: the corners of buildings, a basketball post, the intersection of two trails, a hill top, etc. No matter what the age group, on the first course, students should not have to use the compass to find the points. Wait until your students have done one or more courses before including any control points which require the use of a compass. Start slow and let success build upon success. 5. Use the utmost care when teaching about declination. In twenty years of teaching map and compass, I have found that of all map concepts, declination, the difference between magnetic north and true north, is the most difficult to teach. For younger groups, avoid the concept altogether. For older ages, at some point, you'll need to deal with declination since bearings taken in the field must be adjusted so that they can be applied to the map, and, conversely, map bearings need to be adjusted so they can be used in the field. In the past--and many teachers still teach this way--declination was accounted for by using an addition-subtraction method. Whether to add or subtract depends on whether you live in an area with an east or west declination. Various memory techniques have been employed, including the commonly used rhyme: "East is least" (subtract declination from a compass bearing) and "West is best" (add the declination to compass bearings). This is true if you are converting from a compass bearing to the map, but if you are working from the map to a compass, you need to do just the opposite. The confusion that can result from trying to remember when to add or subtract can literally bring a map and compass class to a halt. I've seen well educated individuals in map classes who have become so completely frustrated using the addition-subtraction method that they've been driven nearly to tears. A young woman--who later became my wife--was one of those, and she was one very good reason why I changed my method of teaching. The secret to avoiding these problems is to work in one system: either based all bearings on magnetic north or base them all on true north. There are three ways of accomplishing this: A. Map Marking. In this method, all bearings are based on magnetic north. While the compass bearing may be used directly, an adjustment needs to be made to the bearing obtained from the map. To do so, determine the map's declination which is printed at the bottom of topographical maps. Using a protractor, draw a series of slanted lines across the map at the declination angle. Normally, when a map bearing is taken the orienteering arrow of the compass is aligned with the sides of the map, but in this method, the orienteering arrow is aligned with the newly drawn magnetic lines. The bearing taken from the map is now based on magnetic north and can be used directly in the field. No adding or subtracting is needed.
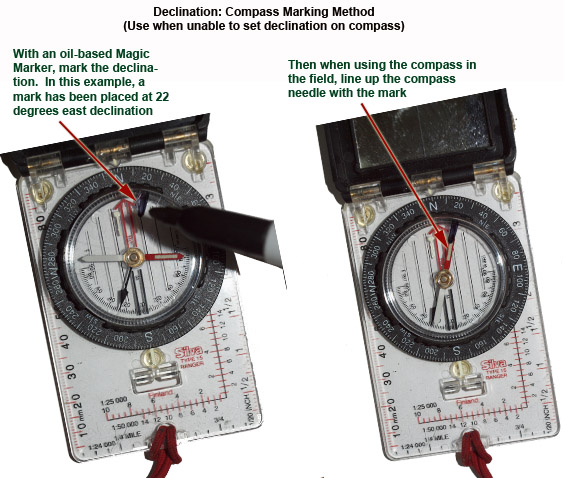
While this method is suggested by a number of map and compass authorities (Kjellstrom), I advise against it. It means taking time to draw lines on the map--and it's a painstaking process to make sure the lines are drawn at the correct angle. Most people who participate in outdoor activities eventually end up with quite an assortment of maps, and if they use this method, it means they will have to draw lines on all of their maps. Moreover, often maps are purchased on the way to an outing, and few people will take the time to draw magnetic lines while on the road. B. Compass Marking. In this method, all bearings are based on true north. Since maps are oriented to true north, it is the compass that needs to be altered. To make the alteration, set the compass at 0 degrees. Take an oil-based Magic Marker and place a mark at the declination angle on top of the plastic capsule which houses the compass needle (Ratliff, 1964). For example, if your declination is 10 degrees west, place a mark at 350 degrees (360 degrees minus 10 degrees). The usual procedure to take bearings in the field is to line up the compass needle with the orienteering arrow, but in this method the compass needle is lined up with the mark. This has the effect of making all compass bearings based on true north. Compass bearings may applied directly to the map, and map bearings may be used directly in the field. There is no subtracting or adding--or drawing lines on the map. Since the mark is in indelible ink, it can't be rubbed or washed off. It can, however, be removed with rubbing alcohol, or white gas (commonly carried on camping or backpacking trips) in the event that the user goes out of state to an area with a different declination. |
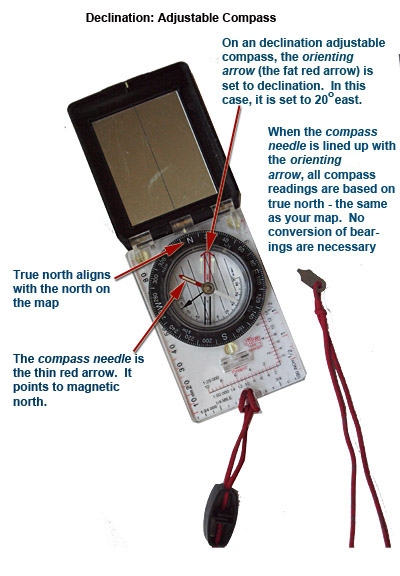
C. Adjustable Compass. The last method is the easiest. If you have a say in the type of compasses which are purchased for your classes, buy compasses in which declination can be set. All you do is to turn the declination adjustment screw on the compass and all readings are automatically converted to true north. There's no further bother. This method and the second method are what I use in my classes, and I found that it has saved myself and students hours of frustration.
Teaching Scenarios Two-hour Course. I use a two-hour course format for map and compass presentations to school children and scout groups. One hour of the class is spent indoors and the other hour is spent outdoors. Begin the class by passing out maps and discussing what a map is (using the "top-down" metaphor--or for young children, use the "miniature world." Discuss map symbols (roads, trails, buildings, lakes, rivers, etc.). Then bring up the idea of directions: the top of the map is north, bottom is south, etc. The compass comes out next. Show how compasses indicate north, south, east and west. Finally, explain how to set a bearing on the compass and how students follow bearings in the field. Practice setting a few bearings indoors. Next move outdoors and do the three-leg compass walk described previously. Two hours isn't much, but it is enough time to give your students an introduction to maps and compasses and pique their interest. After doing the compass walk, you'll find they'll be excited to try more. If you are able to fit another session into the schedule, you'll be able to go into more detail about maps, but always combine an indoor session with an outdoor session. There are other exercises similar to the three-leg compass walk which can be found in the books in the reference list accompanying this paper.
Two-hour Course Curriculum Indoor Session: Hand out and introduce maps Map symbols: roads, trails, buildings, rivers, lakes, etc. Directions: north, south, east, west Compasses: how to find north, south, etc. How to set a compass bearing. Outdoor Exercise: Three-leg compass walk
Two-day Course Two days is an ideal length of time for teaching the basics of map and compass to older and college age groups. I utilize the two day format for my university and community classes, and it's just the right time allotment for them to become comfortable enough with their own skills for outdoor use. The first morning of the course is all indoors. I prefer a carpeted room, so that participants in the class can spread out maps and work off the floor. This informal feeling to the class helps to establish a "fun" atmosphere to get things started on the right foot. Several different map scales (USGS map scales: 7.5 minute, 15 minute, and 1- by 2-degree maps) are passed out so that students can get an idea of the relative areas covered by different scales. From this point on, I work solely with US Geological Survey 7.5 minute maps. This is the most common type of map utilized for outdoor recreation purposes, and it makes sense to spend most of the course time on something students will be using. The goal of the morning session is to try to summarize all the information that is found on a 7.5 minute map. Several different methods may be employed, but my approach is to have them view their map from a global perspective. This leads into a discussion of latitude and longitude and why their map is called a 7.5 minute map. Since latitude and longitude coordinates can get complex, I try not to spend too much time on them and move into the UTM (Universal Transverse Mercator) system which is a far easier for describing points on maps. Covering this material is particularly useful in a college setting since UTM's are widely used in scientific research as well as rescue and military work. Each year, I have graduate students in biology who, among other reasons, take the class for the purpose of identifying research locations using the UTM system. From UTM's, I cover the Township-Range system and briefly point out any other coordinate system that may be on the map. Map symbols and contour lines are left for late morning just before the lunch break. It helps to have at least one if not two visual aids when discussing contour lines: overheads of drawings of land features (hill, stream drainage, ridge, saddle) and their representations in contour lines, and if one is available, a model which can be taken apart to help students visualize contour lines.
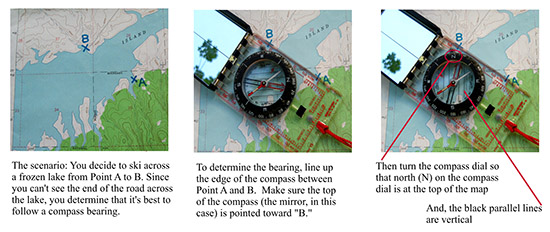
After lunch, the compasses come out and the discussion leads into directions and declination: how declination is set on the compass, and how to compensate for it if a person doesn't own a compass with a declination feature. Moving outside, the class walks up to the top of a hill (the roof of a building will work). Everyone orients their maps and tries to identify land features and landmarks around them. When they become comfortable with the surrounding terrain, maps are passed out on which the first orienteering course has been marked. Before students begin the course, however, we discuss each of the control points and how they can be found. This discussion is key. An orienteering course is a new concept to students, and they need time to digest it and guidance to get started. The first course is very easy, doesn't require a compass, and is designed to begin the process of building wayfinding confidence. When they return, we go back indoors and begin a discussion of bearings. It's important in this discussion to distinguish between map-to-field and field-to-map bearings, taking time to explain how each is done. The day ends with each student determining their pacing (double pacing) over a 100 foot distance and doing a three-leg compass walk. On the morning of the second day, all the material from the previous day is reviewed with particular emphasis placed on determining map and field bearings. The second orienteering map is handed out and time is spent discussing the course and talking about where each point is located. The course has one control point which requires students to use their compasses, and before going out, I have everyone calculate the bearing from their maps and write it down. The illustration, below, is an example of how a map bearing is calculated.
After the second course, bearings are reviewed again, and resection, the process of finding one's location from two distant landmarks, is covered. The class, then, moves to the location of the last and longest of the three orienteering courses. Since this is a college course, I'm there to greet them at the end with a big smile and--a test, of course.
Two-day Course Curriculum: Day One, Indoor Session
Day 1, Outdoor Field Session: Move to hilltop or top of building: using map symbols and contour line identify surrounding features. Day 1, Orienteering Course: Orienteering Course #1: Go through each of the control points and have students follow the course on their own. Day 1, Indoor Session: Map bearings and field bearing Day 1, Outdoor Session: Pacing and three-leg compass walk (to practice pacing and bearings) Day 2, Indoor Session: Review of previous day's material, review field to map and map to field bearing. Hand out the second course map and discuss each point. \ Day 2, Orienteering Course: Orienteering Course #2: No more than one point should require the use of a compass. Day 2, Indoor Session: Review bearings Resection Hand out the third course map and review all points. Day 2, Orienteering Course Orienteering Course #3: Two or three control points may require the use of compass bearings. Books: Maps for America, Reston, VA: US Geological Survey, 1982. A reference book for college level courses. It has useful templates for UTM coordinates, lots of charts and illustrations of the parts of Geological Survey maps. Kals, W.S., Land Navigation Handbook. San Francisco: Sierra Club Books, 2005. This well written book covers all aspects of maps and compasses. It gets my top rating as the best overall text for map and compass at the college level. Kjellstom, Bjorn. Be Expert with Map and Compass (rev. ed.). New York: Macmillan, 2009. Still in print, this is the standard map and compass text. It is particularly useful for school aged children and includes a number of games and exercises. Singleton, Robert. You'll Never Get Lost Again. New York: Winchester Press, 1979. Includes basic map information, but also takes a different approach, concentrating on finding oneself if lost. Barden, Cindy. Mighty Maps! Facts, Fun and Trivia to Develop Map Skills. New York: Lrnz Crprtn, 1997. This is children's learning book of maps. Here's some suggestions for other children map books: 3 Children's Books About Maps
Videos and Materials Available on the INTERNET: "Finding Your Way in the Wild." Richard Diercks Company, 1990. While this 35 minute video will not win any artistic awards, it does cover the basics well and is a good supplement to classroom work. "Finding Your Way with Map and Compass." This brief introduction to using maps and compasses is an on-line version of a booklet that the U.S. Geological Survey publishes. Includes text and graphics. Address: https://egsc.usgs.gov/isb/pubs/factsheets/fs03501.html "Beginning Guide to Orienteering." A very brief description of the sport of orienteering from the Orienteering USA Site: https://www.us.orienteering.org/new-o/beginners-guide "The Sport of Rogaining." What is rogaining? It's orienteering on steroids. It's a long, 24 hour- orienteering races done in teams. Here is more information from the International Rogaining Federation: https://www.rogaining.com/articles.html "Perry-Castaneda Library Map Collection." A comprehensive map holding at the University of Texas, Austin library. A number of maps are downloadable. Address: https://www.lib.utexas.edu/maps/ "US Geological Survey: Maps, Imagery & Publications." The main U.S. government agency in charge of mapping and map services: https://www.usgs.gov/pubprod/ "Scientific Journal of Orienteering." This is a research oriented journal covering aspects of the sport of orienteering. An index to PDF's of the journal is found on the International Orienterring Federation website: https://orienteering.org/resources/publications/scientific-journal-of-orienteering/ . References Ottosson, T (1988). What does it take to read a map? Scientific Journal of Orienteering, 4, 97-106. Blades, M. & Spencer, C. (1989). Children's wayfinding and map using abilities. Scientific Journal of Orienteering, 5, 48-60. Kjellstrom, B. (1994). Be Expert With Map and Compass (rev. ed.). New York: Macmillan. Ratliff, D. (1964). Map, Compass and Campfire. Portland: Binfords and Mort. (Ratliff's book is the first in which mention is made of the simple but elegant method of compensating for declination by making a mark on the compass.)
[END] |