
Home Sweet Winter Home:
Snow Mounds, Thermal Shelters & Quinzees
with Master Builder Allan Priddy
By
Ron Watters
© Ron Watters. "Home Sweet Winter Home" originally appeared in the March, 2011, issue of Cross Country Ski Magazine
Allan Priddy pauses and throws another shovel full of snow on the mound before him. He looks up. The light is dimming now and the temperature has suddenly dropped. His well-used wool stocking hat is scrunched down and touching the tops of fogged, silver rimmed glasses. His beard juts out in an orderless, tawny mass.
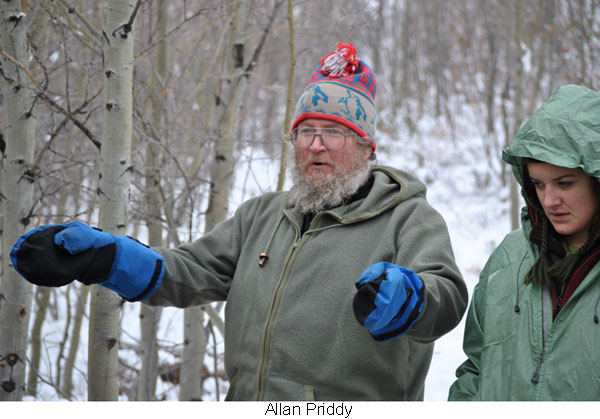
"Grab the end of this tarp," he orders. Allan has a thunderous voice that can fill an auditorium and the hallways beyond. The student standing beside him suddenly snaps to attention and helps him pull the tarp inside.
The tarp is the last touch. Satisfied that his home for the night is ship-shape, Allan's voice rings out again: "Everyone! It's time for the . . . Tour of Homes!"
Students come from all directions, plodding through the snow and gathering around Allan. Allan is a survival instructor, a master winter home builder, and for today's lesson, students in his class have built shelters. Lots of shelters. They are everywhere. Shelters pepper the hillside and the wooded flat below.
Allan escorts the students around on the tour, and as they stop at each "home," he discusses the fine points of their construction, and, as any experienced builder would do, he also mentions the advantages of the neighborhood (friendly outdoorsy folks and great views).
The students examine each, crawling in and out of snow caves, snow trenches, snow mounds, thermal shelters, and one igloo. One shelter is missing on today's tour: the quinzee. Allan has built quinzees before, but he's not a particular fan of them, and there are none here today. Why? We'll learn in a minute.
 If anyone knows snow shelters it's Allan Priddy. Over 40 years ago, he watched in amazement as Greenland Eskimos built an igloo in less than hour, and ever since he has been learning and honing his own winter shelter skills.
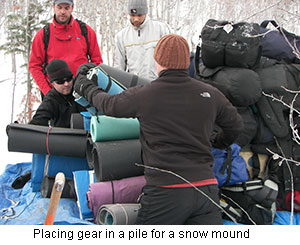
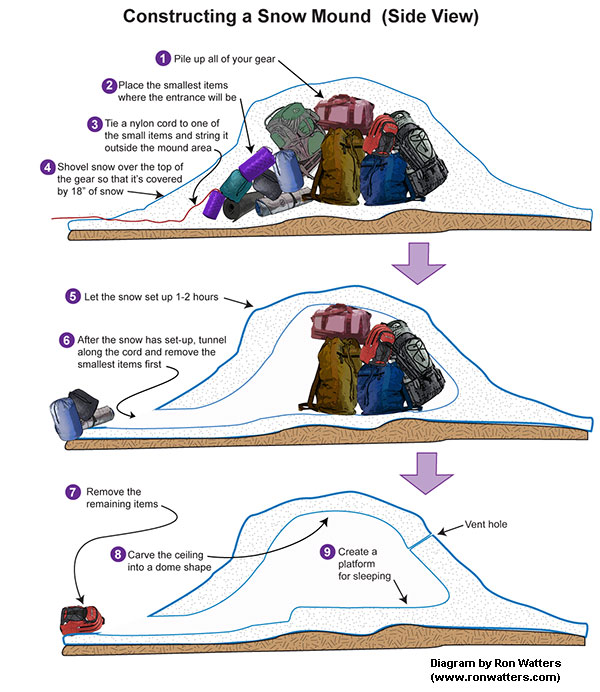
Earlier in the day, when the class first arrived, Allan supervised the students while they constructed a snow mound. The snow mound is a good one for groups, and is easy to build as long as you have a good supply of gear such as packs, duffle bags and sleeping bags. (In the case of an airplane crash, travel bags, suit cases and seat cushions would work.)
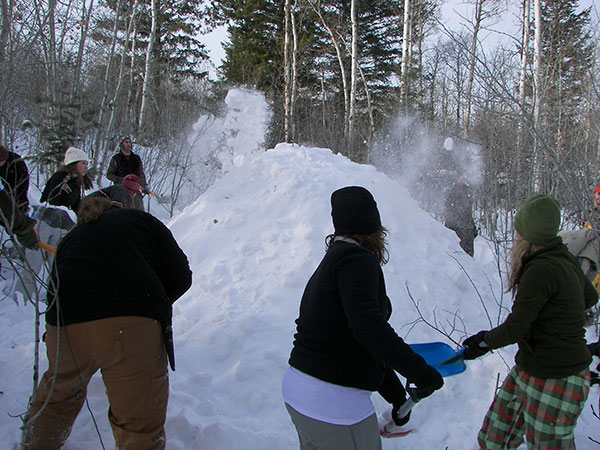
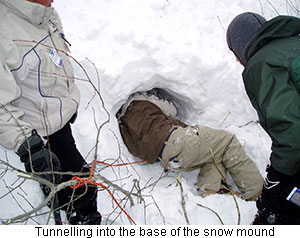
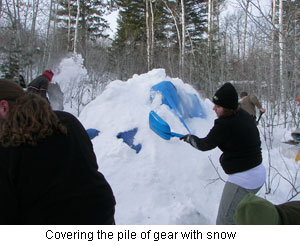 Construction of the snow mound begins by placing all of the gear into a big pile. That's followed by shoveling snow over the pile, completely covering everything. After an hour or two, the snow will harden enough that you'll be able dig into the base of the snow mound and start pulling out the gear.
Once all the gear is pulled out, you'll have a ready made cave in the snow without actually having to dig it out. And it doesn't require a deep snow pack as is necessary in snow cave construction. The snow mound, as you can see, is a pretty nifty home in the snow.
If you try building a snow mound, Allan has secret for you. Actually he has no secrets. He happily shares all of his vast knowledge. Let's not call it a secret then, rather a big hint.
When it comes to removing the gear, it's far easier to pull out a few small items first, followed by the larger ones. For example, you would want to remove a couple of sleeping pads and sleeping bags before a big frame pack. Once you've removed the smaller items, you'll have more room to wrestle out the larger items such as packs and duffle bags. That means you need to do a little advance planning before throwing snow over the top: decide where you want the entrance and then pile most of your small items there.
Another hint from Allan. Before covering the pile of gear with snow, tie a nylon cord or rope (if you have one) to one of the small items at the entrance. String the nylon cord out and away from the pile. Keep the far end of the cord in sight. In other words don't cover it with snow. After the snow on top of the gear has set-up and you are ready to dig out your entrance, you can use the nylon cord to help guide you right to those small items.
 One more thing before shoveling snow over the gear pile: Allan has his students cover the gear with a large tarp. This part is not necessary if you're in a survival situation and you don't have a tarp, but for instructional purposes, it helps keep everyone's gear dry.
Allan points out, however, that it's important to tuck the edges of the tarp under the gear. The tarp will be removed when all the gear has been pulled out. (You'll need to do a little fine tuning and smooth out the ceiling and that can't be done with the tarp in place.) If the tarp is not tucked in, it becomes nearly impossible to remove it without tearing down the shelter. Be sure to tuck it in. That's another one of those big hints.
How much snow should be thrown on top of the pile of gear? Allan uses a round figure of 18 inches. Depending on the temperature and type of snow, you can get by with less, but 18 inches is a good all around figure which works well with different snow conditions.
You might be wondering why the loose snow covering the pile retains its shape once the gear is removed. That's due to something that snow scientists call sintering. Sintering is a process by which snow crystals bond to one another. The more bonding between the crystals, the stronger the snow becomes. By shoveling, you are breaking apart snow crystals, and as they accumulate on the pile of gear, there is now less space between crystals, and they pack together more closely. When you wait an hour or two after shoveling the snow, you're providing time for a network of bonds to form in the disturbed snow. Something that helps the process is mixing in snow from the ground level which helps add a bit more heat, and aids the creation of bonds.
The sintering process is important for other snow shelters, but let's wrap up work on our snow mound first. Once the gear has been removed, Allan recommends that you do a bit of finishing work on the ceiling. Using the shovel, smooth the surface by shaving off the lumps and ridges.
Any snow that you shave off the ceiling can be used for a sleeping platform. The idea is to have a sleeping area which is higher than the entrance. That allows cold air to sink and flow out the entrance. You'll be limited on height of the platform, of course, depending on the snow depth and the size of the snow mound. But even if you are unable to create much of platform, you'll, nonetheless, be much, much warmer in the confines of the snow mound than if you were to sleep outside.
Vent holes should be added to any shelter made from snow, and Allan always checks to make sure his students haven't forgotten them. The holes should be around 3 inches in diameter, and they should be located at a 45 degree angle from the ground. One location where you do not want a vent hole is at 90 degrees, directly on top of the structure. That creates a clear path for heat to flow out of the shelter. So much heat may escape that the hole may melt out, increasing in size, and even drip depending on the temperature.
Allan's knowledge of snow mounds and other winter shelters comes from his time in the far north of Greenland manning a Coast Guard navigation installation, and the far south in Antarctica building remote facilities for scientific work. During one of his training sessions in Antarctica, he and his fellow workers built a series of snow mounds, all very close to one another. They, then, cut holes on the facing sides of two snow mounds, piled up gear between them, and covered the gear with snow. After a wait, the contents were removed, and presto they had a tunnel that allowed them to move from one mound to another. This they did to a whole series of mounds, connecting them all by tunnels. It was party time in the Antarctic.
Now, what about that quinzee? The quinzee, Allan explains, is basically the same as a snow mound but without the pile of gear. With a quinzee (pronounced kwin-zee), you shovel snow into a big heap. Then you tunnel into the base and carve out a room, much like you would if excavating a snow cave.
One question may arise when it comes to digging out a quinzee. How does one keep from carving the ceiling too thin--or worse yet, cutting right through the ceiling? For that Allan uses a measurement tool: sticks. Yes. Sticks. Allan is a high tech sort of guy.
If you are building a quinzee, start by boot packing out an area about 6 to 7 feet in diameter. This provides room for 2-3 people. Increase the diameter for more people. Then start shoveling, using snow from outside the packed area, and create a big pile of snow 5-6 feet high.
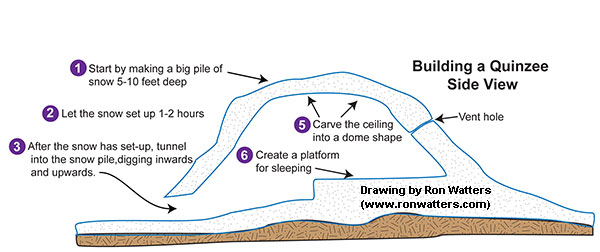
Once you have the mound of snow, it's time for the sticks, our measuring tools. You'll want to push sticks into the snow mound. Think of yourself as a magician plunging swords through a box with your assistant inside. But before stabbing away with the sticks, let's think about this. We want the walls of the quinzee to be around 12 to 18 inches thick, which means that's how far the sticks should penetrate the ceiling. To assure that you have the correct thickness, Allan has you grasp the stick 12 to 18 inches from the end and push it in until reaching your hand.
You don't need to assault the mound with a volley of sticks. Just 8 or 12 sticks will do the job. Once the sticks are in place and the snow has hardened, you dig out the inside of the quinzee, until reaching the end of one or more of the sticks. The sticks, then, are used as a thickness guide as you continue to excavate the inside.
As you might have imagined, the name quinzee is a native word, from the Athabaskan language to be specific. It was their temporary winter structure of choice for areas with thin, loose snowpacks that weren't suitable for igloo blocks. The snow cave is a tried and true winter shelter but, it does require a deep enough snow pack. That's not necessary with quinzees and snow mounds.
Allan isn't a huge fan of quinzees because of the time involved, the amount of energy expended (you move the snow twice: shoveling it into a pile and tunneling and shoveling it back out), and the potential to get wet clothing. Getting wet in a survival situation can be dangerous, particularly if you don't have dry clothing to change into once you are finished. That's why he prefers a snow mound (if you have enough gear). It's quicker since the interior is pretty much ready to go once the gear is removed.
What about the alternative if you don't have enough gear? Allan suggests a thermal shelter or a snow trench.
 I'll cover the highly efficient snow trench in another part of this website, but let's take a closer look at a thermal shelter. It's an important emergency shelter from a military standpoint and is often found described in military training manuals.
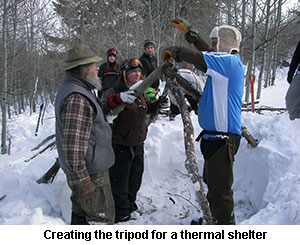
To build one, you'll need some construction materials--high tech materials, of course: branches and pine boughs.
Allan suggests that you think of a thermal shelter as a primitive teepee. You'll need three long branches, preferably as tall or taller than you stand. These will form the supporting structure. For the purposes of this article, we'll call them the supporting tripod. Before erecting them, mark off a circle approximately 6 feet in diameter and dig down into the snow. If you can dig to the ground, that's best since the ground retains some radiant thermal energy that you can use to your advantage. Otherwise, dig down a couple of feet.
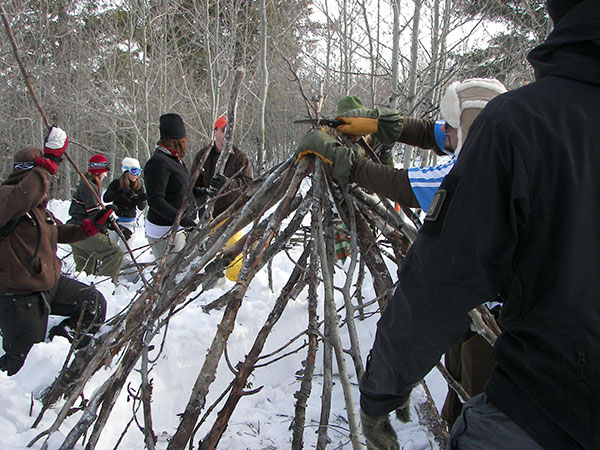
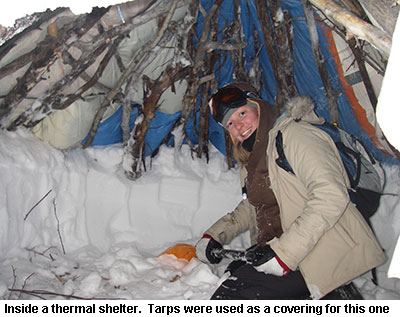
Tie the three long supporting branches together at the tops and then spread them out forming a tripod over the circular area. Lay more branches and sticks on top of these. Then cover with a thick layer of evergreen boughs. You can use a tarp if you have one or if cutting boughs is not appropriate.
If you have some duffle or packs with you, pile them at the entrance. Tie a cord and string it out away from the shelter (as you would if building a snow mound). Then throw snow over the structure until is it completely covered. The snow covering should be at least 10 to 12 inches thick. After it has set up, you can tunnel in, following the cord to the packs, and once they are removed, your entrance will be ready made without much digging required.
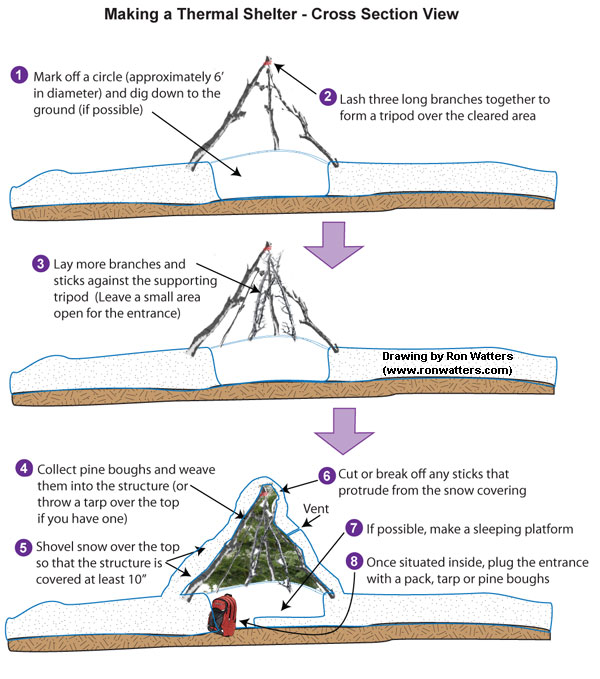
Allan becomes animated when discussing evergreen boughs. Depending on the type of conifer, it can takes gobs and gobs of boughs to seal up shelter enough for it to prevent snow from sifting though. Some boughs just don't seal out snow very well. When you don't have enough boughs, the best technique is to shovel a little snow on the shelter, allow it to firm up, and then shovel some more, then wait again and shovel more. By doing it in increments, the snow hardens some through sintering, and less snow filters through the boughs to the inside.
One of the complications of a thermal shelter are branches that stick out of the snow covering. That's a particular problem, according to Allan, at the apex of the shelter where the supporting tripod branches are tied. If it is possible, try to tie off the branches so that ends are even and close to the tie-off point. If one or more of these branches stick out of the snow, you'll end up with a major heat loss at that point. A hole will develop, and like other types of shelter, the warmth of escaping air will enlarge the hole, and dripping will often occur.
If you have a small saw in your emergency kit (which Allan highly recommends), then it's a simple matter of cutting off any branch protruding from the pine bow coverage. If you don't have a saw, make sure that when you tie the tops of supporting branches that they are flush with one another and won't protrude from the snow. That may mean that one or more branches will be longer and your shelter may look like a leaning teepee, but don't worry yourself about aesthetics. What's important is having a layer of snow over the apex area and keeping warm air inside.
Allan prefers the teepee shape, but another common design is the classic military thermal shelter with an "A" frame profile. In this form of the shelter, you dig out a rectangular area just big enough for you (or two or three others).
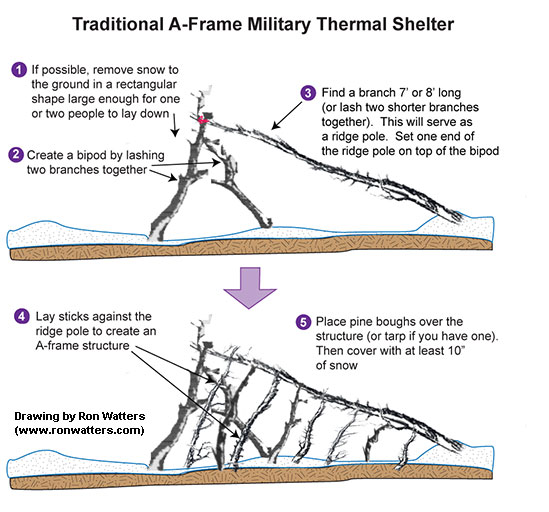
One end of the structure, where your head(s) will be, consists of a bipod (two poles lashed together). Sitting on top of the bipod is one long ridge pole that slants down to the ground where your feet will be. Branches are leaned on either side of the ridge pole in A-frame fashion. The shelter is covered with a tarp or evergreen boughs, and snow thrown over the top.
The thermal shelter is adaptable. For example if you find a tree leaning over, you can use it as a ridge pole, and lay sticks and pine boughs against it. Once you understand the basic principle of the thermal shelter, you can innovate, using what materials are at hand.
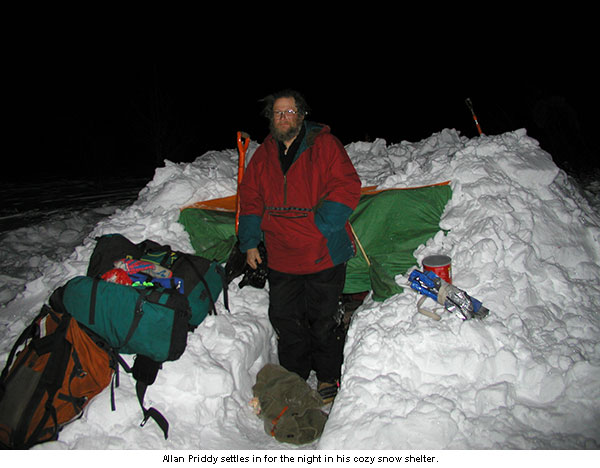
The light is gone now, and Allan quickly concludes the tour of homes. Everyone heads back to the fire. After a warm up and a dinner, and conversation (and a story or two of his experiences in Arctic and Antarctica), Allan gathers up his gear. Class is over for the day. He heads up the hill, takes one last look around the neighborhood, and settles into his own home sweet home in the snow.
Allan Priddy was awarded the Antarctica Service Medal through the National Science Foundation for his time working south of the Antarctic Circle and a winter-over at McMurdo Station. In 1992 Priddy Glacier, a two-nautical, mile-long glacier located in Victoria Land, Antarctica, was officially named for Allan R. Priddy by the Advisory Committee on Antarctic Names. Allan passed away unexpectedly in May of 2020.
[END]