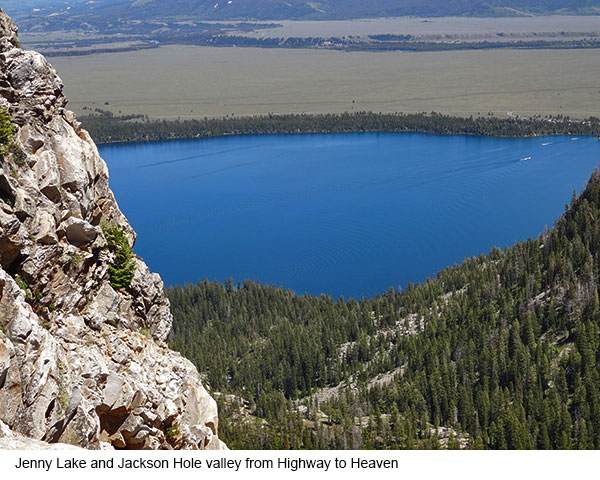
Highway to Heaven – Tetons Rock Climb
Location: Southeast Face of Storm Point – Rock Climb, Grand Teton National Park
Difficulty: 5.7 – 5.8. Seven to eight pitches.
Climbers: Nobuyuki “Yuki” Fujita and Ron Watters.
History: We started working on the route in June of 2012 and finally completed the route on June 30, 2014.
Note: This route was included in the 2015 issue of the American Alpine Club Journal. However, editorial limitations prevented the inclusion of a detailed description of the climb. The description and all accompanying photographs are included below.
 General Information
Highway to Heaven is an outstanding multi-pitch climb on the tantalizing granite of Storm Point. Nobuyuki “Yuki” Fujita and I originally did the climb in eleven pitches. We purposely kept some of pitches short on our exploratory climbs to avoid rope drag and to communicate better between one another. However, in two subsequent climbs, that number was reduced to a more efficient seven pitches.
The climbs ends at Tranquility Point – not an official name, we admit, but an appropriate name considering the elegance and beauty of the climbing to reach it. The climb is all south facing and is climbable throughout the season. (Note that on the following year, we climbed beyond Tranquility and that portion of the climb is described here: Upper Highway to Heaven.
It’s a particularly pleasant route in the early season when other climbs are still snowed in or wet from melt water. It’s slightly easier and closer to the trailhead than Guides Wall (a popular 5.8 climb located a mile farther than this climb), and it serves as a good alternative when things are crowded there. It’s conveniently located near the west side of Jenny Lake, starting and ending at the same location. Many climbs in the Tetons involve a fair amount of scrambling, but not here. This one is all rock.
Gear
 The rappels which bring you back to the starting point of the climb require all of 60 meters, so the best way to climb it is to use a 60-meter double rope – or if you use a single rope, be sure to take along an extra rope for rappels. (If you’re just doing the first two pitches, one 70 meter single rope will do the job.)
You can get by with a fairly light rack. We had a few small chocks, one of each cam from the smallest up to 4-inch (we did use the 4 inch cam a couple of times), around 10-12 shoulder length slings, and our own cordelettes. That was perfectly adequate for lead and belay station anchors. During the two recent climbs of the route, Peter Walka and I reinforced the existing rappels, but since route is fairly new, it’s a good idea to bring extra sling material to further beef up anchors.
Getting To the Trail
Take the boat across Jenny Lake (or hike the 2.5 mile Jenny Lake trail) to the Cascade Creek Trail. (Hint: there’s a reduced fare if you catch the earliest boat) The Cascade Trail leads to the popular Hidden Falls and Inspiration Point. Continue past Inspiration Point. Approximately .6 mile from Inspiration Point, the trail which has been mostly in trees enters an open area. Cascade Creek will be to your left. The creek which to this point has been a series of rapids suddenly becomes smooth and lake-like for a short stretch. It’s at this point where the flat water starts that you’ll turn to the right, off the trail, and climb uphill to start of the climbing route.
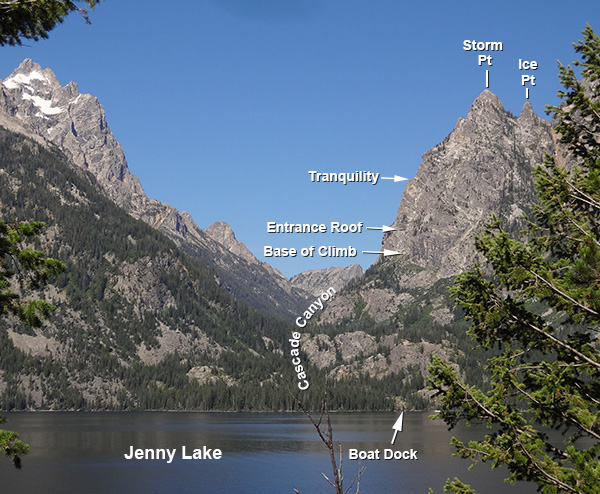
Getting To the Base of the Climb
Before hiking up the talus and scree slope above the lake-like water of Cascade Creek, look to the right (north) and upwards. The main buttress of Storm Point on which you’ll be climbing is somewhat protected by a lower cliff band a couple hundred feet above Cascade Creek. Above the cliff band is an upper bench with scattered trees. The climb is accessed from this bench. The lower cliff band has a break in it directly above where the flat water of Cascade Creek turns into rapids. You’ll want to head for this break in the cliff band.
Hike upwards through the break in the cliff band and continue hiking straight uphill. As you approach the buttress, look for a ramp, and if you spot it, head towards it. If you don’t see the ramp, hike straight up until reaching the buttress. Once you reach the base of the buttress, turn left and hike a short distance around the base of it. In less than 200 feet, you’ll come to the ramp.
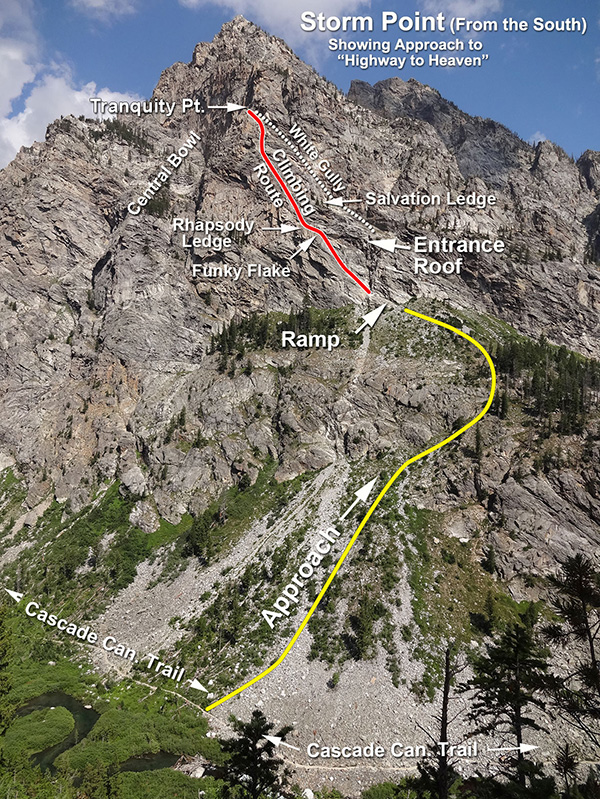
 The ramp is about 15 feet wide, covered with a light layer of scree and extends upward about 20 feet. Hike up the ramp to its top. When you reach the top, you’ll see a shallow gully a feet few below where you are standing. The upper part of the ramp is a good place to sort gear and leave unneeded items behind. The climb begins in the shallow gully and ascends the southeast face directly above.
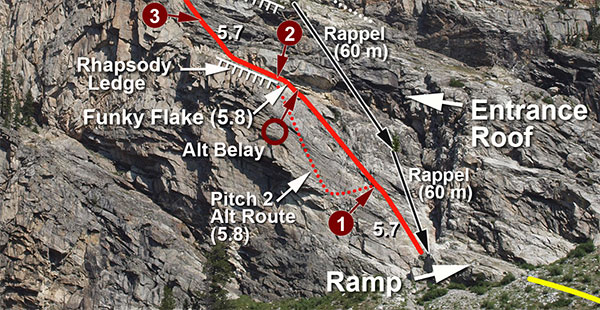
The climbing route is shown in the photo below. More details on each of the pitches and the rappel route follows.

The Climb
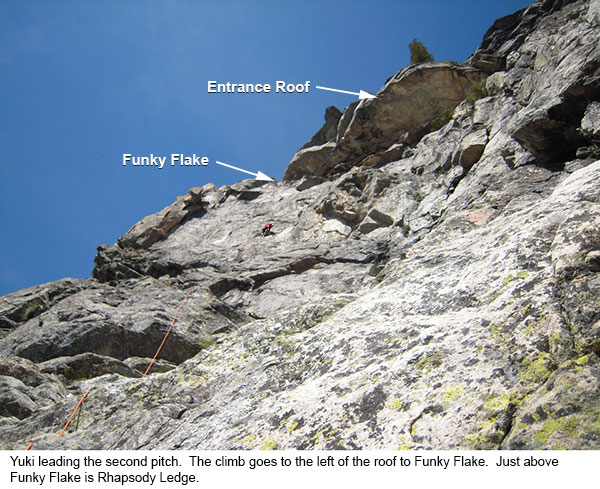
First & Second Pitch. From the top of the ramp, you can see the first two pitches. You’ll be looking at a southeast facing slab that extends upward 200 feet. The top of the slab is guarded by a huge roof (Entrance Roof) that extends from one side of the slab to the other. The start of the climb begins on a smooth slope with small holds. The slope quickly eases off and then steepens up again midway up to the roof.
Entrance Roof is an imposing barrier, but it can be avoided by climbing around it to its extreme left side – where, just above and to the left of the roof, you’ll find a nice ledge (Rhapsody Ledge).
When Yuki and I were first exploring this route, we ended up doing three variations of the first two pitches. The first pitch is more limited in variation, but if you move slightly up the gully (at the right side), you’ll find easier climbing (around 5.6) and more difficult if you climb it diagonally to the left (5.7). The first pitch eases up fairly quickly and a belay can be set-up on lower angled slopes – or you can move up several more meters of steeper rock to a higher belay.
The second pitch can be climbed on the right, middle, or left side of the slab. If you go up the right or middle of the slab, you’ll want to end up on far left side of the Entrance Roof where you’ll find “The Funky Flake.” (When viewed from below Funky Flake resembles the shape of a boot.) Funky Flake is just that. It’s funky. It requires a couple of convoluted 5.8 contortions to surmount it.
When we initially climbed it, we set up a belay just under the left edge of the roof. A big cam is helpful here behind the flake for protection. You may also wish to set up the belay here so that leader and belayer are close together – and you can listen to each other as you grunt your way up the Funky Flake.
Just above Funky Flake is a welcomed, roomy ledge (Rhapsody Ledge). Note that if you climb the left edge of the slab (5.7+ to 5.8), you can avoid Funky Flake entirely and end up on Rhapsody Ledge.
(Note that if you are just doing the first two pitches with a 70-meter single rope or double rope, then you may want to end the second pitch at the small trees 12 meters below Entrance Roof. You’ll find a rappel anchor there. Natural features on or near Rhapsody Ledge which could be used as a rappel anchor appear to be limited and those that do exist are a bit on the sketchy side.)
Third Pitch. Rhapsody Ledge is the starting point for the third pitch. Walk up the ledge to left (west) where the short vertical wall above the ledge looks most climbable. Climb the path of least resistance up black slabs (5.7) for about 35 meters and look for a small roof that’s just large enough for one or two people to get under. There are actually two of these small roofs, both located fairly close together. A belay can be set-up under either roof.
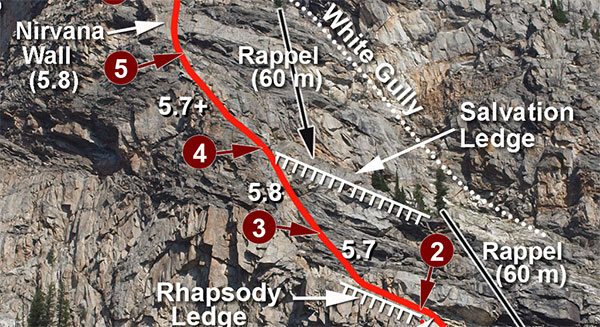
Fourth Pitch. The next lead (the fourth pitch) is a bit harder than the previous with a couple of 5.8 moves not far above the belayer. Continue climbing upward until reaching the far end of a long ledge (Salvation Ledge). The ledge is actually inclined, so the term Salvation Ramp might be more technically correct, but we’ll call it a ledge. The ledge’s lower end (to the east), begins with a small group of live conifer trees and slants upward and terminates where the belay will be located at the end of Pitch four.
Salvation Ledge provides an alternative to climbing the entire route. If you only have time for 4 pitches, you can exit from here. It also provides a way of exiting route if the weather turns ugly. The last (and large) conifer tree at the lower end of the ledge has rappel slings which are used when descending the entire route. From here, you can return to the start of the climb with two 60 meter rappels.
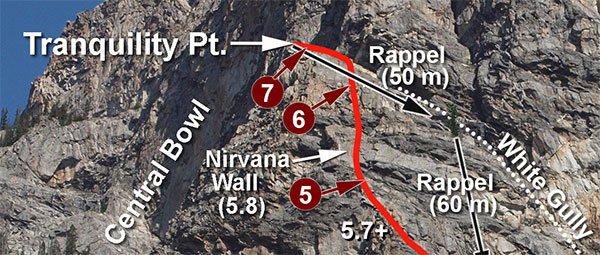
Fifth Pitch. The next pitch (the fifth pitch) climbs directly above the belayer and moves slightly to the left (west) where it ascends a wide chimney which narrows for a short distance into a dihedral (5.7+). Just above the dihedral and to the left is an airy view into the Central Bowl of Storm Point. Continue climbing above the dihedral, slightly to the right, up easy terrain until you can see what appears to be a smooth face with overhanging blocks on its right edge. This is Nirvana Wall. Set-up the belay under one of the small overhangs below and just to the right (east) of the wall.
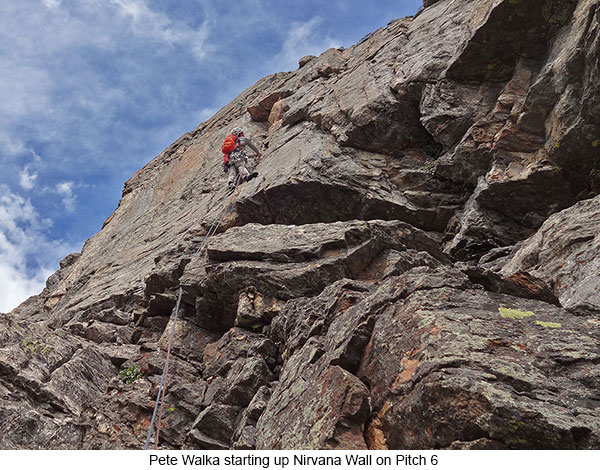
Sixth Pitch. The sixth pitch, the crux of the route, begins by ascending Nirvana Wall. You’ll find the most challenging climbing on the first 10 meters. It looks harder than it appears, but once on it, holds and cracks in which to place protection will appear. One fixed pin will be found on the wall.
Continue climbing above Nirvana Wall for nearly a rope length to a point just below a subsidiary ridge that leads to Tranquility Point. Set-up a belay here.
Seventh Pitch. One last pitch (the seventh pitch) of mostly scrambling along the subsidiary ridge takes you to the top of Tranquility.
Tranquility is the high point of the climb. If you have taken the early boat across Jenny, Lake there should be enough time to rappel the route and catch a ride back across the lake. Although . . . if you happen the miss the boat, you can take comfort that you are not alone. During one of our early exploratory climbs, Yuki and I looked down from high on the route, wistfully watching the wake of the last boat as it sped across the lake.
(Note that it is possible to continue the climb from Tranquility to the summit of Storm Point. In mid July of 2015, Pete Walka pioneered a route through the overhanging walls rising above Tranquility Point. The route consisted of two spectacular 5.10 pitches on flawless granite. A detailed description of that part of the route is found here: Upper Highway to Heaven.)
Getting Down from Tranquility Point
From the top of Tranquility, there’s a very wide U-shaped gully (White Gully) between you and the formidable walls which guard the upper part of Storm Point to the north. The subsidiary ridge (Tranquility Ridge) that you climbed to the top of Tranquility Point lies on the southern edge (the Cascade Canyon side) of this gully.
To get down, you’ll follow Tranquility Ridge back down the same way you climbed it (in other words, you’ll be heading toward Jenny Lake), but you’ll continue past the point where you climbed onto the ridge. (As you’ve been climbing the route, you’ve been moving slightly left (west) so, for rappelling purposes, you need to move back to the right (east) to position yourself over your starting point.)
Just below the top of Tranquility Ridge, you’ll find two large boulders with rappel slings. You could downclimb much of the ridge, but since there’s considerable loose rock, the rappel is probably more efficient and safer. Rappel down about 45 to 50 meters to a dead tree standing alone on the ridge. For this first rappel, the 45 to 40 meter range seems to be the best distance for a successful retrieval of the ropes.
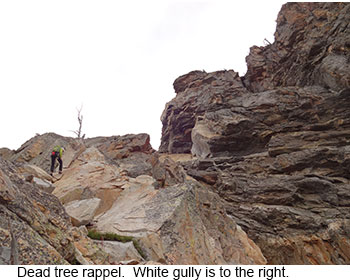 From here, we did a short 10 meter rappel off the tree. No slings were used. Since the base of the tree is smooth and round — and it’s dead so no environmental damage can result — we just wrapped the rope around it. We actually did more of downclimb than a rappel to keep from weighting the tree. Check to make sure that the tree is secure or find an alternative anchor.
It’s just a short scramble — perhaps another 10 meters or so — beyond the dead tree rappel to two isolated trees standing next to one another. You’ll find slings and a carabiner (or other rappel gear) here. Check, of course, to make sure the trees are secure. Sixty meters, directly below this point, towards Cascade Creek (south) is Salvation Ledge, the ledge that you passed earlier on the climb which has conifer trees on its lower end. A 60-meter rappel will make it to this ledge.
Once completing the rappel to Salvation Ledge, walk downhill through scattered conifer trees until reaching the last tree. It’s a nice, sizeable live tree which is perfectly positioned on the edge of the next vertical drop. Since the tree is a several feet in diameter and has thick lower branches, you’ll find a couple of long slings with a descending ring which extends out away from the tree branches to provide a clear path when it comes time to pull the rappel rope. (If you’re reinforcing this rappel sling, you’ll need a good 15 feet of sling material.)
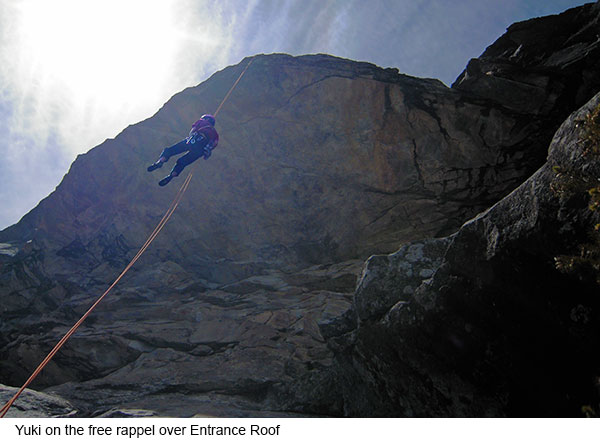
This rappel takes you down over the Entrance Roof which is found near the top of the second pitch. Be ready for a free rappel as you go over the roof. Again you will need almost all of 60 meters to complete this rappel. You’ll end up 12 meters or so below Entrance Roof where there’s a choice between two or three live conifers for the final rappel. You should find slings in the lowest conifer. These are small trees — and once again you’ll want to make sure they are secure before doing the rappel.
Another full 60 meter rappel will get you all the way down to the start of the climb. One caution on this last rappel. The rappel ropes go across the gentle slope near the end of the first pitch. Since it’s not vertical in this area, there are a number of spots where the rope can get caught up. Either be really careful on rope positioning when you pull it – or do the last part in two rappels instead of one. On one of our early exploratory climbs we did set up a second rappel anchor near the top the first pitch on its eastern side which enables you to do it in two rappels.
Concluding Remarks
Since Storm Point’s south face is so easily accessible, many different climbs have been made there. Other climbs have certainly been made on routes adjoining Highway to Heaven. We did find two fixed pins along (the mid to upper part of) the route which appeared to be left from climbs which crossed the one described here. Highway to Heaven, itself, appears to be new since we found no rappel anchors or other signs of previous climbing activity on the route as a whole – and we could find no written description of it.
We found this route thoroughly captivating. It has a little of everything: terrific rock, great climbing, and good variety, all on a spectacular route overlooking the brilliant blue of Jenny Lake. If desired, you can just ascend the first two pitches – or the first four pitches - for a shorter option. Whether you do an abbreviated version or the entire route to Tranquility, you’ll find it a truly exceptional multi-pitch rock climb.
Note that a description of the route beyond Tranquility Point (and to the summit of Storm Point) has been posted here: Upper Highway to Heaven.