
Whitewater Rafts and Drift Boats
Ron Watters
From The Whitewater River Book: A Guide to Techniques, Camping and Safety. Copyright 1982 by Ron Watters. Revised 1996, 1998.
Note that the Whitewater River Book is now out of print, but I am putting together an updated, on-line version of the book which will be available on this web site. Other chapters available include: Planning Multi-day Rafting Kayaking Trips and Kayaks and Other Whitewater Craft.
Introduction
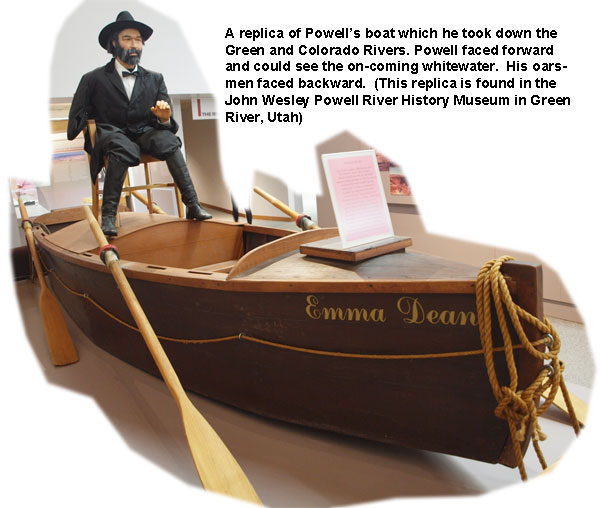
 In the late 1860s Major John Wesley Powell and a party of eight others ran the Green and Colorado rivers. It was one of world's greatest whitewater adventures. Powell and his men used three, twenty-one-foot-long oak boats, and one, sixteen-foot pine boat down--each vessel powered by oars and turned by a stern sweep.
Powell, a scientific man, collected bits and pieces of natural information along the way. At one point on the journey, he and his assistant, named Bradley, scaled the canyon walls to take a barometer reading to determine altitude. The climbing became difficult for the one-armed Civil War veteran. He reached up to hold onto a rock above him and suddenly found himself posed delicately on a precipitous cliff, on the verge of falling off and tumbling onto the boulders below.
 "The moment is critical," he wrote. "Standing on my toes, my muscles begin to tremble." Bradley scrambled above him, but was not able to obtain a close enough position to reach Powell. He frantically scanned the rocky cliffs looking for a branch of a tree to hand to Powell clinging below him, but nothing was available.
Then Bradley had an idea. Pulling off his trousers, he hung them down to Powell. Powell grabbed the trousers and was pulled to safety.
The adage that small events change the course of history was proven true again. Powell might not have completed running the wild rapids of the Colorado and explored one of the last unmapped, unknown parts of the United States had it not been for Bradley's drawers.
Powell went on a second expedition on the Colorado using boats similar to those on the first, but this time he sat on a chair lashed high on the deck and scouted the coming rapids. These days, Powell probably would have to pay big money to get people to row his boats. His system wasn't all that oarsmen-friendly. Nowadays oar boats are rowed with oarsmen looking downstream. They can see what's coming at them. But in Powell's boats the oarsmen rowed with their backs to the oncoming rapids and depended blindly on the major shouting out orders to them.
During the years after Powell's journeys, wooden boats were improved for whitewater use. Metal and fiber glass dories that now are used on many western rivers are a direct outgrowth of the earlier models. Rubber rafts, then, began to appear, and especially proliferated when surplus rubber rafts were available at the end of World War II.
Rafts manufactured today are constructed of various types of synthetic materials. They come in a variety of sizes and shapes. Their distinguishing characteristic is that they are pliable but tough enough to absorb the shocks of banging and scraping against rocks without damage--most of the time, that is.
Oar Rafts and Paddle Rafts
A convenient way of classifying rafts is in terms of how they are powered: by oars or by paddles.
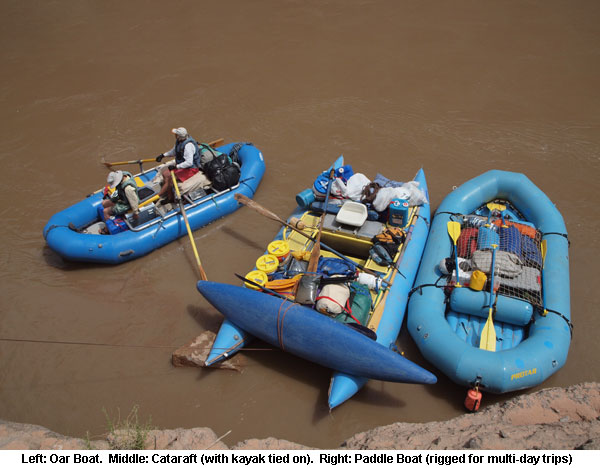
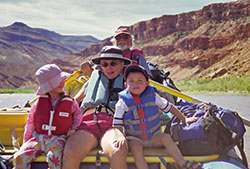 In an oar boat, one person takes the oars and runs the rapids, making it a good choice for families. The oars are normally mounted to a solid frame lashed to the top of the raft's tubes. Because of the frame, which is made of wood or metal, an oar raft is particularly well adapted for carrying lots of gear for overnight trips. River equipment suppliers sell frames with built-in storage boxes and coolers.
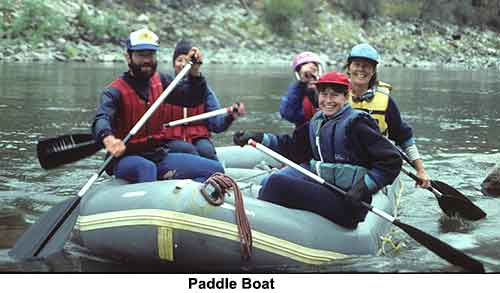
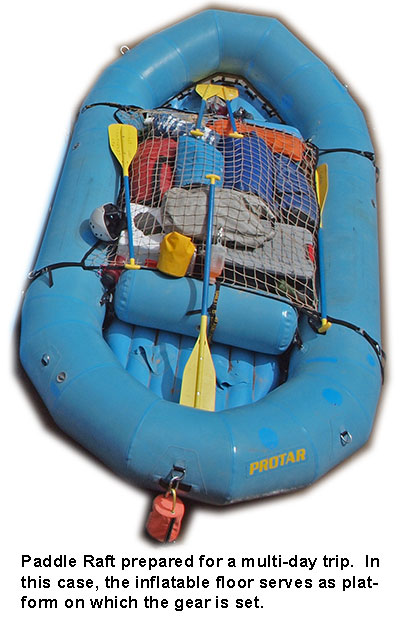
Paddle boats, as opposed to oar boats, are run by everyone in the raft. Each person has a paddle, and working as a team, the group maneuvers the boat down the river. Paddle boats are primarily run without frames, although for overnight trips a frame can be mounted in the middle of the raft to carry equipment.
Both forms of river running have their advocates. Oar raft advocates are strongest among boaters in the western United States, while the East has many paddle advocates. The differences in style are due largely to what types of rafting runs are popular in an area: the larger, roomier rivers of the West are suited to oar rafts, while the smaller, tight rivers of the East are suited to paddle rafts.
Payson Kennedy who has a wealth of experience guiding and teaching rafting on rivers in the East, says that paddle boats are very effective and maneuverable on most eastern rivers and that oars in fact are "impractical" on a few rivers such as the Chattooga in South Carolina and Georgia. B.A. Hanten, a long time oar rafter and raft designer in Oregon has a different view. In a letter to me, he wrote: "I would defy any paddle crew to keep up with me in really picky water if I had a properly loaded raft."
B.A. is a better oar rafter than I. Not long ago, I had a heart-thumping, white-knuckled kayak run down the boulder strewn Chattooga River. If given a choice between a paddle boat and an oar raft, I wouldn't hesitate. I'd choose the paddle boat.
While there will always be regional differences and friendly disagreements on which style of rafting is better, I've found that over the past decades greater diversity has come to both areas. Paddle boats have increased in popularity in the West, and likewise, oars have made inroads on rivers in the East. When it comes down to what type of raft setup you use, select the one that you like the best and that works for the rivers you run.
Features
The materials, design, and other features of a raft influence how it responds in a river.
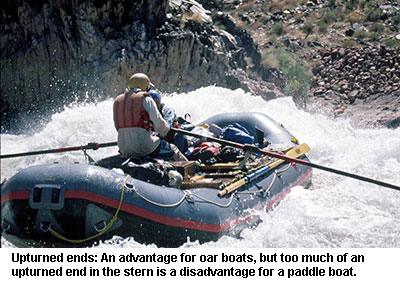
Upturned Ends. Nearly all rafts have one or both ends upturned. Ron Mattson who started one of the first river supply companies says that a shorter waterline length--the length of the raft that is actually in the water--enables the raft to pivot quicker. The quicker the pivoting ability, the easier the maneuvering. To achieve a short waterline length, the ends of rafts are upturned or raked.
B.A. Hanten who was the first to market a raft with both ends upturned, says that his reason for using the design was not to achieve quicker pivoting, but rather to help eliminate the pressure the current exerted on the stern while a boatman using oars ferried back and forth. Ferrying, covered later in the book, is the basic technique on which most of oar raft technique is based. As a result, the upturned end allowed the water to run under it, preventing current from piling up against the stern.
For oaring, upturned ends are definitely a help, but for paddling, if they upturned too much, the paddlers can't reach the water. A good paddle boat has a medium upturn on the front and only a slight upturn on the stern. In this way, the stern paddlers easily can reach the water to execute strokes, as can the front paddlers if they sit just aft of the upturn.
Width. The wider the raft, the more stable it will be if it turns sideways in a rapid and is washed through a big hole. A raft with less width, however, will turn quicker and run smaller, tighter channels.
Tube Diameter. Tube diameter determines the buoyancy of the boat. The larger the tubes the higher the boat floats, the easier it pivots, and the more gear it carries. But large tubes cut down on the amount of room in the boat and are harder to row when faced against strong winds. For paddle rafts, the tubes cannot be so large as to prevent the paddlers from reaching the water.
Some general, but not necessarily absolute, guidelines on tube diameter are: for class I through III water, use a minimum tube diameter of twelve to thirteen inches; for class IV and above, use a minimum of fifteen to sixteen inches. If you generally run larger rivers with big rapids, go with larger tubes than these guidelines suggest. Tube diameters can get as large as thirty-six inches, but most boats lie in the fifteen- to twenty-two-inch range.
Materials. Inflatable rafts are constructed of a stronger tear-resistant base fabric made of such materials as nylon, Dacron, or Kevlar. To provide resistance to abrasion, the fabric is coated with a synthetic material such as neoprene, Hypalon, neoprene-Hypalon blends, or polyvinyl chloride (PVC). It is difficult for the consumer to tell the difference in the quality of the materials used in the construction of boats since a wide variety of manufacturing processes and qualities of fabric and coating are used Generally, price is the best guide--the more expensive the boat, the better the materials used--although a few exceptions exist, such as when a manufacturer sells directly to customers, avoiding middlemen. First learn from friends what works best for them and buy from reputable companies.
Thwarts. Thwarts or cross tubes add lateral stability to the boat and more buoyancy. Removable thwarts generally are desirable since they allow you flexibility in using a frame and storing gear.
Chambers. All boats used for whitewater should have at least two chambers on smaller crafts and four on larger. If one chamber deflates because of a bad tear, the boat then is able to remain afloat.
Valves. Valves should be recessed or covered, so that they are not damaged by moving gear and people getting in and out of the boat. On one cheap inflatable raft I owned, a paddling partner was thrown out in a rapid. On the way out, he scraped against a valve that was not recessed or covered, badly lacerating his knee. Valves also should be large enough (one inch is preferred) so that a high volume of air can pass in or out, speeding up the inflation or deflation time.
Rings and Other Attachments.
D-rings glued to the sides of the tubes of the boat are used for lashing the frame and/or gear in place. The more D-rings a boat has, the better. Additional D-rings can be purchased from various boating supply companies. Strong D-rings are necessary where the bow and stern lines are tied. These lines are used for tying the raft to shore, lining it through rapids, stopping in tight spots, and even pulling it off when it is pinned on a rock. Therefore, the ring and attachment must be solid and strong.
Size
The size of boat you use may be determined by the number of passengers you plan to carry, by the amount of gear you need to haul, or by the size of river you plan to run. For multi-day trips the amount of gear and people carried will be determining factors influencing the size of raft selected. Hanten advises that you purchase a boat large enough to carry the biggest load you anticipate. Do not go by the ratings used by some manufacturers--for example, "eight-man," "sixteen-man." These generally are the number of people that can be crammed into a life raft in an emergency on the ocean, and have no application to whitewater.
The "Determining Raft Size" chart will help you determine the number of people the raft will comfortably hold for paddling or oaring. The figures allow for the additional weight of carrying equipment for a week-long trip. The smaller rafts listed must carry lightweight-style equipment and food, while the larger rafts can carry heavy, luxurious-style gear if desired. The figures are only approximate. You may want to add or subtract people to accommodate your situation better. For instance, Ron Mattson suggests adding one to three people in lieu of baggage on day trips and Reg Lake of River Touring Equipment suggests adding one more person to paddle boats to act as "captain" in the stern.
Table: Determining Raft Size
Length of Raft Width of Raft Paddle Boat
Maximum Number
of PeopleOar Boat
Maximum Number
of People8 to 10 feet
(2.4 to 3.1 meters)4 to 5 feet
(1.2 to 1.5 meters)2 1 11 to 12 feet
(3.4 to 3.7 meters)5 to 6 feet
(1.5 to 1.8 meters)3 or 4 2 12 to 13 feet
(3.7 to 4.0 meters)5 to 6 feet
(1.5 to 1.8 meters)4 2 or 3 13 to 14 feet
(4.0 to 4.3 meters)6 to 6.5 feet
(1.8 to 2.0 meters)4 to 6 3 14 to 16 feet
(4.3 to 4.9 meters)6.5 to 8 feet
(2.0 to 2.4 meters)6 to 8 3 to 4 16 to 18 feet
(4.9 to 5.5 meters)7.5" to 8 feet
(2.3 to 2.4 meters)8 5 to 6
Care
Rafts made of synthetic materials are tough and can withstand a lot of abuse, but observing the following points will help prolong their life:
-
Be careful when traveling to and from the river. Pad the raft so that in transit it will not vibrate against any sharp objects. Some friends of mine borrowed my brand new raft and treated it like a baby on the trip, but upon return, the boat rubbed against the side of their trailer, wearing a hole in the tube. Keep the boat in a heavy sack while traveling.
-
Keep the boat clean while on the river. Sponge out sand and pebbles, which can grind away the corners of the raft's floor
-
At the end of the trip give the raft a good washing. Allow it to dry and pack it away.
-
Store the boat in a dry, cool area, dusting it with talcum powder to help it keep dry. Avoid piling other heavy items on it. Some manufacturers recommend storing their boats half inflated if storage space is available.
Self Bailing Rafts
One of the little annoyances that a boater has to endure in a traditional raft is wet feet. No matter how careful you are about getting in the boat or how diligent you are with the bail bucket, some water manages to get in the raft and stays. Invariably, it forms a little pool around and underneath your feet which keeps them soaked for the remainder of the trip.
The nice thing about a self bailing raft, is that the little pools of water under the feet are gone. Gone also are boats filled with water in big rapids. The principle is simple. The self bailing raft is designed with a floor that has drainage holes on the edge and that sits slightly higher than the water surface of the river. When water splashes in the raft, it runs to the edges of the floor and out the drainage holes, back into the river.
Different manufacturers use different schemes to accomplish self bailing. Most common is an inflatable floor which stays rigid and is laced to grommets attached to a strip of raft material at the inside base of raft tubes. Some manufacturers forego the lacing and attach the floor on permanent basis, utilizing grommet holes for drainage.
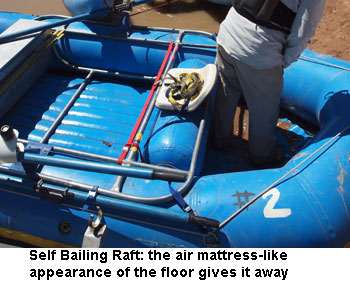 Self bailing rafts are generally recognizable by the furrowed, air mattress-like appearance of the floors. Some rafts, however, have inflatable floors with a so called "drop thread" construction which allows them to be flat on top and bottom.
All this does not come without a price. Self bailing rafts cost more than their traditional cousins. The extra flooring also adds weight and bulk, particularly in the larger sizes.
But self bailers have significantly expanded the limits of raftable water. Longer and more difficult rapids are possible now that heavy, unmanueverable water-filled rafts are no longer an encumbrance. In particular, self bailing rafts really come into their own for paddle rafting difficult whitewater. It is a delight to watch (and, to be a part of) a team of polished paddlers running a small or medium sized self bailer down a steeply dropping river.
Catarafts
Catarafts have become very a popular way of running whitewater--and for good reason. They are light, highly maneuverable, and provide a thrilling ride. The design is open and unhindered. Catarafts consist of two inflated tubes, tapered on each end, held together by a metal frame. They can be paddled or oared, or even paddled and oared at the same time.
Some of the oar arrangements are set up so two people--one in the front and one in the back--can oar in tandem, or one person can oar from the stern while two people paddle in the front. With the open interior, water splashes up from between the tube as well as from the side. All in all, a cataraft ride is wet and it is a rush.
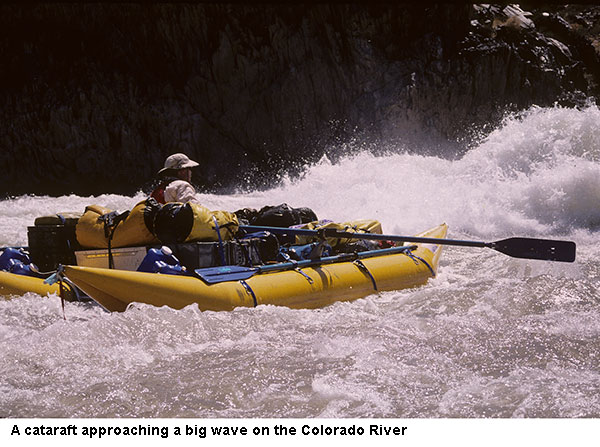
Catarafts are not for every one. Many cataraft frames are designed purely for lightness and maneuverability and do not leave much room for tying on overnight gear, if that is what you are planning to do. They are not as safe and comfortable for passengers--particularly elderly passengers and children--as are traditional rafts. Everything has to be tied on. If you drop something in a cataraft, like your sun glasses, they are gone.
At the same time, they are incredibility adaptable. A friend of mine brought his cataraft to the mountain lake where Kathy and I were having our wedding reception near the headwaters of the River of No Return. It was ideal for a going out for spin in quiet waters of the lake and enjoying the grandeur of the surrounding Sawtooths Mountains.
Catarafts have other uses. They have been equipped with outboards for beach camping, used by fire departments for rescue purposes, and floated by fishermen as "low profile" drift boats. And, of course, they are self bailing.
 Paddle Raft Frames
For multi-day trips, some paddle rafters lash a small frame on their raft to hold gear. The frame should be located in the center of the craft so the boat remains easy to pivot. Paddle raft frames can be made out of wood. Two-by-six inch pine boards held together with carriage bolts make a simple but efficient frame. If desired a stronger metal frame can be constructed from conduit pipe. To prevent rips, the gear should not rest on the floor and can be suspended on a webbing net or a plywood floor board. However, things are easy if you have self bailing raft with an inflatable floor. The floor can provide enough of a cushion to protect the bottom of the boat from tears and punctures.
Wood Oar Frames
Although, metal tubing is the most common material used for oar rafting frames, it is possible to build frames from wood. Certainly, wood is not as strong or durable as metal, but it is inexpensive when compared with commercially available frames and works adequately for most river running.
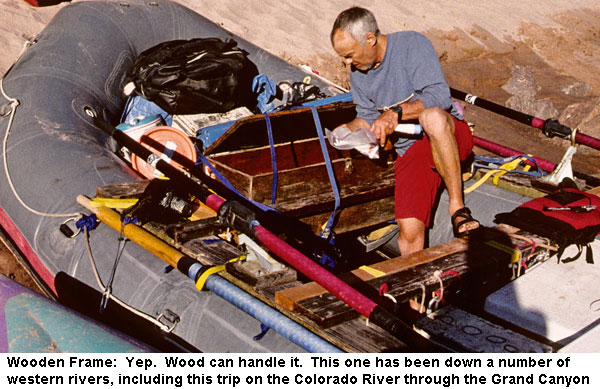
As you build a wooden frame, there are a few points to keep in mind. Two-by-six boards of pine or fir are adequate. For more strength and comfort when sitting but also more weight, you can use two-by-eight or wider boards. The length of the boards depends on your boat. Inflate the boat and set the boards on top of the tubes. Cut the seat boards to fit across the raft. Before assembling the frame, lay all boards in place and be sure everything fits. Use carriage bolts to bolt the boards together. Do not bolt the oarsman seat until after the oarlock mounts are in place.
Recess the bolts so they do not protrude beyond the edge of the wood. And exposed bolt can cause damage to the boat or injury to a person who scrapes across it. To prevent wear, glue carpet to the bottom of the boats which on top of the tubes.
Oarlock mounts can be purchased from rafting suppliers. Mount them on boards sitting on top of the tubes so that they are located in the middle of the raft or just a few inches toward the rear. The middle of the board on which the oarsman sits should be mounted sixteen to twenty-one inches behind the oarlocks. Before actually bolting the oarsman's seat, put the oars in place and sit on the seat to be sure the arrangement feels comfortable for oaring.
Metal Oar-raft Frames
 Metal frames are now the most commonly used frame on an oar raft. They are strong, light, and available in models that break down for transporting to and from the river. Constructed of steel and aluminum tubing, a wide variety of models is now marketed by raft supply companies.
As part of the frame design for gear storage, various styles incorporate large coolers for seats, boat boxes, or tables. Customizing of metal frames is possible through various companies that sell them, or you can design your own metal frame and have a welder close to home do the work.
Additional Gear Storage Hints
For either wood or metal frames, there are a few additional points to consider.
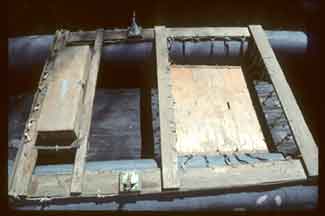
To provide additional carrying capacity, you can hang pieces of plywood, cut to fit, on the inside of the boat. These "floorboards" can be hung with webbing affixed to the frame or to D rings on the side of the boat. Coolers, boat boxes, and other gear can be set on the boards.
Check the floorboards from time to time while on the river. They sometimes can work down and sit directly on the bottom, making the floor very vulnerable to rips. To help give the boards extra support, some boaters inflate inner tubes and tie them to the underside of the boards, or as Ron Mattson suggests, you can fasten ethafoam, available from river supply companies, to the bottom of the boards using contact cement. If you use floorboards, remember to leave an area open so you can bail out the boat.
 Since everything you carry should be suspended off the floor and tied in place, loading and unloading boats can take time. Anything that is built into the frame that will make the loading and unloading process easier will save time on the river. Using nylon straps with buckles is less time-consuming than tying and untying knots. Various types of clips, such as carabiners used by mountain climbers, can be used to get equipment on and off easily.
I use a large open bag made out of heavy-duty nylon for storing all kinds of gear, large or small: duffel bags of personal gear, Dutch ovens, buckets, and so on. It clips onto a middle section of my frame, with a net of nylon webbing below it providing extra support for the bag. The top folds over, and all the gear is securely held in place with a couple of straps.
Some boaters pile gear on a suspended floorboard and throw a canvas or heavy-duty tarp over the gear. The tarp is clipped down and with a series of ropes or straps laced over the top to lash everything down securely. A white canvas tarp is particularly useful over food containers, since on hot days, a damp, white tarp keeps food cool.
Oarlocks and Oarlock Mounts
The types of oarlocks have their advocates. U-shaped oar locks are favored by those that desire fine control of their boats. They are almost exclusively used on drift boats. Pin-and-clip oarlocks are common on heavy, large rafts where getting the boat down the river takes precedence over exacting moves.
U-Shaped Oarlocks. Also called oar horns, open oarlocks, or simply oarlocks. U-shaped oarlocks are constructed of bronze, manganese, silver bronze or other materials. They allow the oars to be rotated or to
be pulled in and out of the lock.
B.A. Hanten points out that U-shaped oarlocks allow the oar to be rolled slightly while being pulled through the water. The rolling of the oar changes the pitch of the blade so its gets a full bite of water as it travels in an arc with each stroke, giving the rower the most power for energy expended. Hanten describes it as being similar too adding a turbocharger to an automobile. Because the U-shaped oarlocks are flexible and allow oars to pop out of the oarlocks when under a great amount of stress, many boatmen feel they are safer.
U-shaped oarlocks slip into oarlock mounts or sockets bolted to the frame of the boat. They are available commercially.
Tholepins and Clips (Pin & Clip). This oarlock system consists of a pin or heavy shaft of metal mounted on the frame. A clip is attached to the oar and clipped on the pin for rowing. The advantage of this system, according to advocates, is that it keeps the oar fixed in place as strokes are
made.
With U-shaped oarlocks, an oarsman always must keep a tight grip on the handles and be sure the oar blade is correctly oriented. That is not the case with tholepins and thus, they are a good choice, advocates recommend, for people learning how to oar. So once again, the choice of which type of equipment to use is a personal preference.
Other Systems. Other oarlock systems are available, including round oarlocks, clamped-on types, and various other improvisations, but the U-shaped oarlocks and thole pin systems are the most common.
Oars
Oars come in various sizes and types:
Wood or Synthetic. Both synthetic and wood oars are available. The best wood oars are straight-grained ash oars. Check for knots, which weaken the oar. Wood oars demand extra care and for protection should be coated with a marine oil or exterior varathane. The handle, however, should not be coated in order to provide a good gripping surface.
Synthetic oars are available and now have surpassed wood in strength. They usually consist of a plastic blade with a metal shaft covered with a plastic lamination. Some models have interchangeable blades in different widths, which are convenient if a blade is broken.
The finest synthetic oars are made from carbon fiber. That makes them light and incredibly strong. The newer carbon fiber oars have a much better flex, closer to the feel and flex that one gets from wood oars. Nonetheless, I prefer wood when I'm using a 9 or 10-foot oar. I just love the feel and responsiveness of wood, and I don't notice much difference in weight. But when I'm oaring a large boat that might take a 12-foot oar, I pull out the carbon fiber. A 12-foot carbon fiber oar is clearly lighter and not nearly as tiring after a long day on the water when compared to the same sized wood oar.
Oar Wrapping / Oar Sleeves. Oars used in U-shape oar locks need to be protected by wrapping the oars. Various materials can be wrapped around the shaft, including nylon cord (3/16 braided), leather, or webbing. Or they can be protected by plastic oar sleeves sold by river supply companies. Oar sleeves almost always have an oar stop (see next) built into them.
If interested, I have prepared a webpage on how to wrap oars. Here's where to find it: How to Wrap an Oar.
Oar Stops. Oar stops are necessary if you utilize the U-shaped oarlock Without them, the oar easily could slip off and fall into the river.
The exact location of an oar stop depends on personal preference. Some like to position it slightly above where the oarlocks encircle the oar shaft. Others position it at the top of the oar wrapping. A few of us position it higher on the oar shaft. I position mine just below the oar handle.
Of the various oar stop positions, the one closest to the oarlocks is probably the most common. It keeps the oar in place. If the oar slips out of your hand, it won't slide down through oar lock where you might loose control. It's probably the best position when learning.
I happen to be a proponent of placing the oar stop near the oar handle. You don't see it very often.
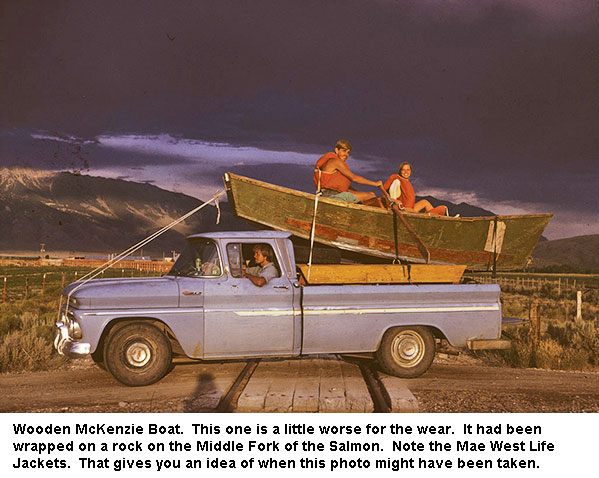
It is a placement favored by some guides who run McKenzie boats on rocky rivers like the Middle Fork of the Salmon. I use the position for oars on my 16-foot raft and even for a large, 22-foot cataraft I use on big rivers. I like because it is less confining and allows me more flexibility with the oar. I can reach out, for example, and catch an eddy current.
Oar Length. Oar size is based on the width of the raft. A general rule for determining oar length is that one-third the length of an oar should fall between your hand and an oarlock. The "ideal" is not always wanted and there are other factors, such as comfort, the weight of the load, and personal preference, that enter into the decision. The "Determining Oar Size" chart will give you a general idea.
Boat Length Oar Length 8 to 10 feet
(2.4 to 3.1 meters)6 to 7 feet
(180 to 210 cm)11 to 12 feet
(3.4 to 3.7 meters)7 to 8 feet
(210 to 240 cm)12 to 13 feet
(3.7 to 4.0 meters)8 to 10 feet
(240 to 310 cm)13 to 14 feet
(4.0 to 4.3 meters)9 to 10 feet
(270 to 310 cm)14 to 16 feet
(4.3 to 4.9 meters)9 to 10 feet
(270 to 310 cm)16 to 18 feet
(4.9 to 5.5 meters)10 to 12 feet
(310 to 370 cm)
Paddles
Here's a run-down on paddles for river running:
Grips. The best grip for whitewater use is a T grip. The T shape provides a good hold for paddlers in the forceful currents of rapids.
Length. The length of a paddle for whitewater rafting will fall in the 4- to 6-foot (120- to 180-centimeter) range. Actual size depends on the height of the person using the paddle and the size of the tubes on the raft. The ideal size is determined by sitting on the tube of the boat. As you begin to paddle, the top hand on the grip of the paddle should be at nose level while the paddle blade is immersed totally in the water for a stroke. The stern paddler in a raft may opt for a slightly longer paddle since he may be making wide, sweeping strokes.
Pumps
Two types of pumps are available: a foot bellows pump, which requires little expenditure of energy since the leg muscles are used, and a barrel pump. A barrel pump involves a little more work, but moves a far greater volume of air. If you choose a barrel pump, go with a large-volume type that has a barrel with a 5-inch diameter and an 18-inch length. The bigger it is, the better. Big pump move more air in less time than smaller pumps. Also, electric pumps that plug into car lighters for quick inflation are available. But always carry a manual pump for use in repairs or for tightening up the boat while you are on the river.
Waterproof Bags
The style of your trip may determine the type of waterproof gear storage containers you use. If you are going on a luxurious-style trip, heavy gear bags are not too much of a problem. You may use heavy wood boxes, fiberglass containers, and bulky, metal ammo cans. But if you are traveling light or just do not like messing with heavy containers, you will want to use soft, waterproof bags.
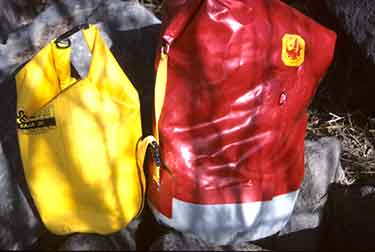 Various vinyl and polyethylene bags are available on the market. Some are cheap and usually are ready to be disposed of after the first trip. Others are expensive and well made. If you decide to use vinyl or polyethylene bags, select those that are covered with a nylon outer bag to protect them from punctures and tears. These types of bags, nonetheless, are delicate, and many boaters prefer to go to a stronger, longer lasting bag.
 Some of the best, soft, waterproof bags are constructed of materials similar to those used in inflatable rafts. These bags, available commercially, are constructed of PVC-covered Dacron, Hypalon, or other materials.
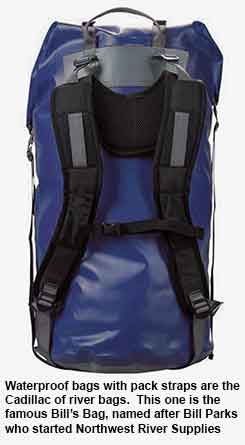
My favorite is a waterproof bag with pack straps. The straps make it so much easier to load and unload it, not to mention the ease in carrying it to and fro your campsite. It was invented by Bill Parks who started Northwest River Supplies. In fact the bag is called a "Bill's Bag." Bill was just getting his river supply business started when he joined our party for a memorable high water trip on the Selway River. We all managed to get off the river in one piece but the power of the river at that water level was a humbling experience for all of us.
With any type of waterproof bags, the closure is the weak link in the system. One reliable method of sealing the bag is to use a slide closure. Slide closures are available from river supply companies. I use slide closures on certain fold-over-and-strap-down tops that were supposed to be waterproof. Slide closures can pop off under pressure, but can be secured by using inner tube bands, described later in this section.
Other systems include roll-down-and-clip-shut, zippered, and tied tops.
Unfortunately, a number of bags on the market are a farce. They may be advertised as "waterproof," but in reality they allow water to leak in, usually through the closure. The best test for any bag is to fill it with water, close the top, and tip it upside down. Not even a drip of water should appear. If it does, send it back to the company or take it back to the store. This unnecessary leakage is unsuitable for whitewater use. if you put money into a waterproof bag, 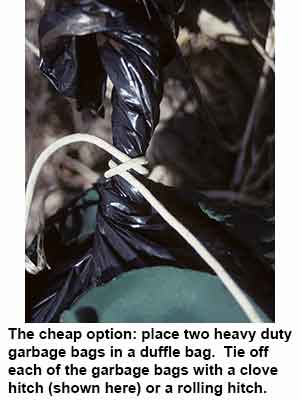 and most are expensive, you should be assured it will not leak. I once bought a new waterproof bag with a roll-down top. After a day of normal splashing, I opened the bag to find my belongings, including three books, soaked.
A cheap storage method, if money is tight and you have barely enough to pay for gas to get to the river, is to use thick plastic garbage bags. Put two garbage bags inside a duffel bag or rucksack. Stuff your gear in the inside garbage bag, packing hard items inside soft items to prevent tears. Squeeze all the air out of the inside garbage bag. Tie it off with a clove or rolling hitch. (The photo to the right shows a clove hitch.) Then tie off the outside garbage bag with another clove or rolling hitch. Use the duffel bag or ruck sack on the outside to keep the bags from ripping.
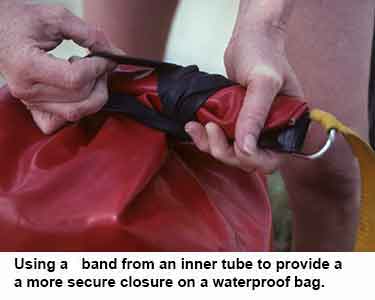 On certain types of waterproof bags, especially those that roll down, you can use a loop from an inner tube to help keep the bag rolled tight and sealed. This a particularly helpful when your bag is quite full and you are unable to roll the top down adequately. Make two cuts through an inner tube so that you make a large rubber band one-half- to three-quarters-inch thick. Wrap this around the rolled up closure several times to get a secure seal. The inner tube band is quick and easy. Bring extras along as they can be used for other purposes as well.
One final hint: Before closing a waterproof bag, encircle it with your arms and push out all the air. Sometimes it helps to close the top partially, then push as much air out as possible. The bag should look drawn and sucked in. Quickly close the bag completely. This procedure helps relieve the pressure on the bag material and its seams and makes it easier to lash down.
Rigid Waterproof Containers
The most common and most widely available rigid, waterproof containers are those used to carry ammunition, often called ammo cans. Some boaters use sealed wood boxes; others use fiber glass boxes. Al these containers are heavy. For lighter weight, waterproof plastic boxer are available in different sizes--smaller ones for carrying cameras, first aid items, or repair supplies and larger ones for carrying bulkier items.
They are carried by river equipment suppliers. When you buy rigid waterproof containers, carefully examine the opening. To prevent water from leaking inside, the opening should be clamped down against a gasket. You can use the same test for waterproofness on rigid containers as is used on soft containers. Fill the container with water, seal it, and turn it upside down. No water should leak from the lid. This test is particularly important with rigid containers since they may be used for valuable items, such as cameras and binoculars.
Rigid containers should have strong tie-on points to make them easier to lash to the raft. Strong handles should be provided on larger containers to aid in moving them on and off the raft when they are filled with heavy gear.
A cheap alternative for rigid storage containers are large, five-gallon plastic containers that are used for food items such as mayonnaise. You may be able to acquire these from restaurants or school or hospital food service operations. The containers have leak-proof lids and are ideal for keeping gear and food dry.
Drift Boats, Dories and McKenzies
Long before inflatable rafts were available, wood dories were used by river runners tackling whitewater rivers. No chapter on river craft would be complete without mentioning them. River dories or drift boats closely resembling the North Sea fishermen's dory have been adapted to meet the demands of whitewater.
Constructed of wood, aluminum, or fiber glass, dories are beautiful, maneuverable, hard-hulled boats. Because of their comfort and aesthetics, they are the Cadillac of whitewater craft, but due to the unforgiving nature of the materials used in building them (as compared with rafts), boatmen who run dories must have a high degree of skill. (See the "Inflatable Rafts and Dories" chart for a subjective comparison of rafts and dories. Its primary purpose is to present a general idea of the differences among them.)
The McKenzie boat, developed on the McKenzie River in Oregon, is an example of one particular style of dory and is functionally oriented to fly fishing. The boat is constructed so that a fisherman can stand and brace himself in the front of the boat and lay his line on a special lining deck. The boat is highly maneuverable and, with a skilled boatman, can run surprisingly rocky' technical whitewater.
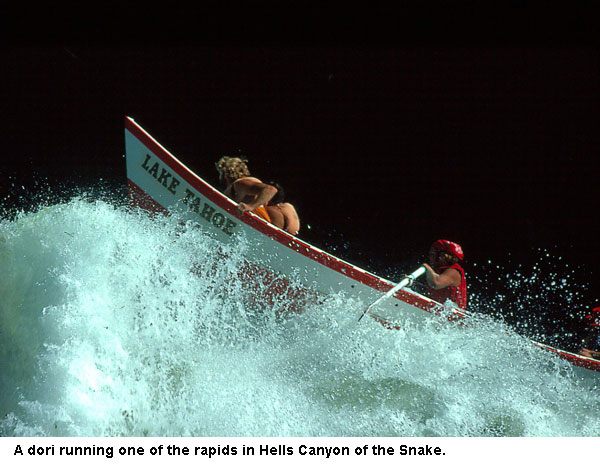
 Other styles of dories include larger, decked-over models, which are used in big whitewater such as that found on the Colorado River or Hells Canyon of the Snake.
Comparison of Inflatable Rafts and Dories/Drift Boats
| Type of Craft | Advantages | Disadvantages |
| Inflatable Oar Raft | Can carry a large amount of gear. Comfortable. Good for use with children. Unskilled passengers can ride. When used with certain types of frames, the ride can be fairly dry through splashing rapids. | No group participation. Can have difficulty in certain types of I small rocky rivers. If frames are used, more chance of injury if boat capsizes. |
| Inflatable Paddle Raft | Everyone participates. Good choice for small, shallow, rocky rivers. Some very effective, complicated maneuvering can be carried out by a well trained paddle crew. Some amount of leaning and bracing can be done in executing eddy turns and preventing capsizing in holes. | Commands to maneuver boats must be relayed to all paddlers, slowing reaction times. Rides are wetter and for some people, uncomfortable. For difficult whitewater, the paddle crew needs to work together and practice in advance. |
| Dories/Drift Boats | A luxury class of river craft. More maneuverable than inflatable rafts. Seats with cushions and back rests. Dry. Aesthetically pleasing. McKenzies, a type of dory, are the best boats for fishing. | Boatman must be highly skilled. Boats are more easily damaged than inflatable rafts. Repair is more difficult. Limited amount of gear can be carried. Some heavier dories are not -suited for shallow, rocky water. |
[END]